 |
| 5/25/21 Prismacolor pencils on Stonehenge White |
Learning to draw trees with graphite from Kathleen Moore
a few months ago was both informative and inspiring. When I heard she would be
offering a new class in drawing nature with colored pencils, I was interested,
but what made me sign up was that we would be drawing from life, not photos. Although
I had gained a solid foundation in drawing with colored pencils when I studied with Suzanne Brooker several years ago, we worked entirely from
photos then. We drew from real plants in Crystal Shin’s botanical workshop,
but there wasn’t much time in a weekend to sink our teeth into small studies.
I’m excited about this five-week Gage course with Kathleen and doing some
deeper teeth-sinking.
Week 1’s lessons were on the basics of making and blending marks with the colored pencil medium. Much of this was review for me, but what was new was using various types of blending materials, which I have dabbled with on my own but hadn’t learned to use formally. The purpose of all these blending materials, I learned, is to freshen the surface of previously applied pigment so that more layers of pigment can be added without flattening the paper’s tooth. (I don’t think I was using them properly before, as they seemed to flatten the tooth in my previous experiments.) If more than one color has been used, they also blend the pigments.
Edited: After today's class, I understood more about blending materials, and I misstated part of the paragraph above: Solvent is the only material that will blend pencil pigments without flattening the paper's tooth so that more color can be applied afterwards. That is why many colored pencil artists use it. Dry materials like white pencil and colorless pencil will flatten the tooth.
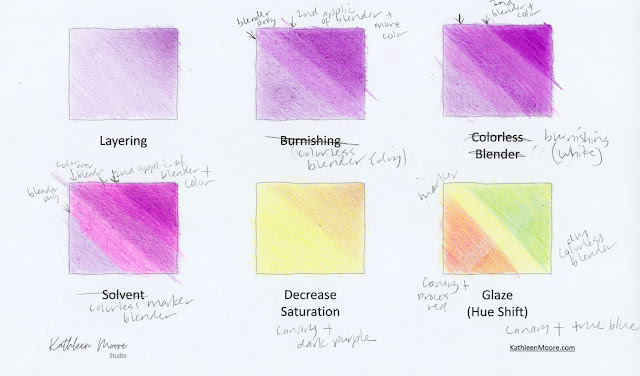
The materials we are using are a Prismacolor colorless blending pencil, a White Prismacolor as a burnishing/blending tool, and a solvent (Kathleen had suggested odorless mineral spirits called Gamsol, but I couldn’t find it in a small bottle, so I’m using the similar Turpenoid). In addition, I happened to have a Prismacolor colorless blender in marker form (which can be used to blend both colored pencils and alcohol-based markers), so I gave that a shot, too.
Kathleen recommended Prismacolor pencils for this class. My worksheet below is messy because I used the wrong materials in the labeled boxes, but you can see the results of my experiments. The White pencil gave the smoothest blending results, but the dry colorless blending pencil was the easiest to apply and control. I didn’t like using the colorless marker at all because it altered the hue significantly. The first four squares were all made with the same Prismacolor Dark Purple, but the colorless marker turned the color bright pink.
 |
| Worksheet using various blending tools (printer paper) |
 |
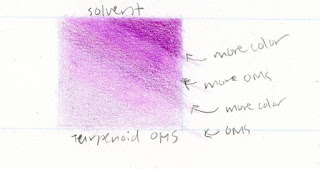
| Turpenoid solvent (Stonehenge hotpress) |
The worksheet above was done on basic printer paper, which has a terrible surface for use with colored pencils. For my last sample using Turpenoid (left), I wanted a heavier paper, so I made that one on Stonehenge Hotpress, which has a much better surface for colored pencils. Although I generally avoid using toxic solvents, I wanted to try the odorless mineral spirits to see how it compared with the other options. I’m sure my technique is lacking, but I wasn’t impressed with its blotchiness. I don’t see a compelling reason to use a poisonous substance when benign, potentially better options are available (like the colorless pencil), but I’m keeping my mind open to see how Kathleen uses it.
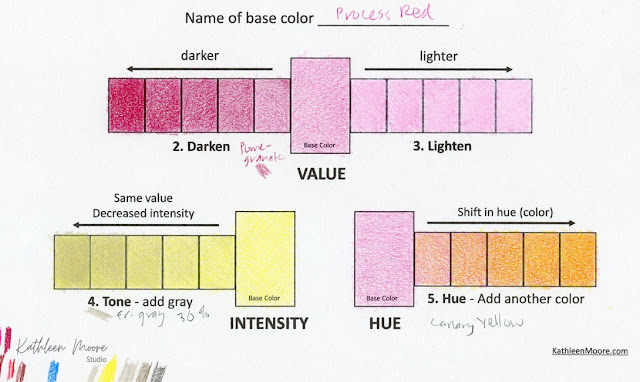
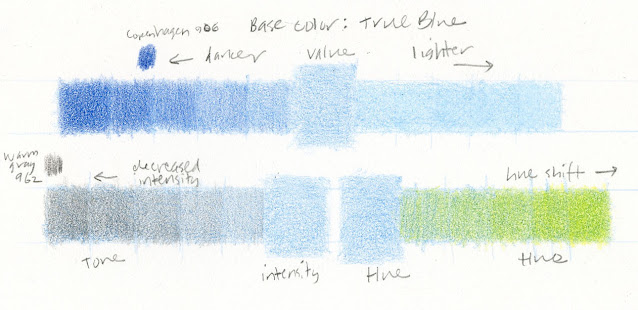
Another lesson from Week 1 involved making worksheets to change the value, intensity and hue of a pencil color. I made my first worksheet using Process Red and Canary Yellow as base colors on printer paper. Again, I hated applying colored pencil pigment to that paper (and I also realized too late that I was supposed to do all three exercises with the same base color; apparently reading directions is not in my skill set!), so I made a second worksheet with True Blue as the base color, and this time I used Stonehenge Hotpress paper.
 |
| Printer paper |
 |
| Stonehenge Hotpress |
For both value exercises, we were to use a darker shade of the base color applied in increasing layers to darken the base color; we were to use a White Prismacolor applied in increasing layers to lighten it. On either type of paper and for both Process Red and True Blue, I found the White Prismacolor to be ineffective at lightening the hues. I don’t know what I’m doing wrong, but I saw no difference in the tone, no matter how many layers I applied. The White pencil just isn’t opaque enough.
For the intensity exercises, the assignment was to find a gray of the same value as the base color and use it to decrease its intensity with increasing layers of the gray. The challenging part was identifying a gray of the right value. (She recommended using a grayscale attached to a color wheel, which I have somewhere . . . . I’ll have to dig it out.)
Week 2’s assignment was to make a simple still life with a few rocks (top of post) and apply the techniques we learned from the Week 1 exercises. I admit, I am typically not too excited about drawing rocks, but I was thrilled by this assignment! It made such a difference to be drawing from life instead of a photo. Once I started observing the rocks closely, I became fascinated by all the subtle colors I could see. I ended up choosing nine, which might be too many for a small drawing, but I enjoyed practicing blending the various hues.
 |
| The nine Prismacolor colors used in the still life |
I tried using the White Prismacolor to lighten areas (such as the barely distinguishable highlights), but as with the worksheet exercises, I found it to be ineffective. I liked the subtle texture imparted by Stonehenge White paper for these rocks. In the case of cast shadows, however, I wanted to remove the specks of paper showing through. Easy to apply even in small areas like the top rock’s slender cast shadow, the Prismacolor colorless blender pencil was especially effective for that. It was also effective in blending colors evenly. I think it’s a keeper in my colored pencil tool box.
Incidentally, although I’m tired of Zoom, Kathleen is an excellent online instructor. Using multiple cameras, she videorecords her demos in advance so that students can view them at their convenience, repeat sections, slow them down or speed them up as needed. Then we meet on Zoom for live critique and discussion. I’m eager to get back into the Gage classroom whenever it becomes safe to do so, but the one thing I’ll miss about virtual learning is being able to see demos easily and clearly, which is not possible when peering around other students or over the instructor’s shoulder in a classroom.

I am really impressed by your rocks. The textures and values rock! (Pardon the pun.)
ReplyDeleteHa-ha! :-) Thank you!
Delete