Monday, April 30, 2018

Asymmetrical

4/25/18 Maple Leaf neighborhood

Just around the corner from my house is this one with an interesting asymmetrical roofline and façade. Although less common, I’ve seen a number of Tudors with faces like this. Whenever I see a tiny window like the one just under the pointed top, I imagine a secret room filled with books. (It’s probably just an attic, I know, but I like to imagine.)

Given the number of Tudors I keep sketching, maybe I should just make this a series about Tudors instead of about Maple Leaf neighborhood architecture! We do have other types of houses, though. . . these just happen to be my favorites.

Sunday, April 29, 2018

Frank in the Shadow of the Troll

4/28/18 Fremont Troll

The last time I sketched the Fremont Troll, it was on a scorching summer day last year when the shade of the Aurora Bridge and a soft breeze had kept several urban sketchers comfortable.

Yesterday morning, 12 students in Frank Ching’s workshop sought shelter under the same bridge – this time from rain instead of sun. Under the Troll’s watchful eye (singular), Frank talked about “Locating, Framing and Composing Views” in urban sketching.

By the time I got there, the heavy rain had slowed to a drizzle, but the weather still wasn’t exactly hospitable. After snapping a few photos of Frank and his students, I was going to leave, but then the Troll caught my eyes (plural). Although I’ve sketched him several times, I couldn’t resist another quick one.


Saturday, April 28, 2018

No Right Angles

4/27/18 Top Pot Doughnuts, West Seattle

After a phenomenal week of sunshine and record-breaking heat on Thursday, Friday dawned cloudy with a chance of rain, which normally would have been disappointing for our sketch outing in West Seattle. I was eager, however, to apply the concepts I learned last week in Andika’s workshop, so I didn’t mind staying indoors at Top Pot Doughnuts.

It was only after I sat down with coffee and an apple fritter and looked around the room that I began to realize something strange: Top Pot has no right angles! The walls, the almost-L-shaped bar, the funky, partially rounded ceiling trim – everything is slightly askew.

Fortified with fat, sugar and caffeine, I attacked the room, grumbling and occasionally muttering, What would Andika do? I had planned to put at least some of my doughnut into the sketch, but it took me a full two hours to do the sketch, so the doughnut didn’t have a chance.


My group selfie is as crooked as the room I sketched.

Friday, April 27, 2018

A Big Hole on Roosevelt Way

4/25/18 Roosevelt Way NE at NE 85th

This is one of the excavators I sketched on its day off last Sunday. It’s been busy ever since, digging a big hole on Roosevelt Way in front of Maple Leaf Park. I was told by the curious workman who came by to see what I was doing (he thought I was from the city, EPA or some other agency to check on the work) that the main project is to make the busy arterial safer for crossing pedestrians. The big hole, though, is related to sewer work that has to be dealt with before the other work can be done.

This project could go on for a while. I think it may be worth another sketch or two! Stay tuned.

Thursday, April 26, 2018

I Couldn’t Resist Another Brick Tudor

4/24/18 Maple Leaf neighborhood

My plan on this morning was to sketch one of the frame Tudors on 83rd, where there’s a whole row of lovely ones on one block. But I must have been distracted, because I found myself walking on 82nd instead, where there’s a whole row of even more charming brick Tudors. This is the plainer type without a conical roof over the porch, but it still has some nice details in the brickwork around the arch (which, unfortunately, I couldn’t capture on the shady side). I might have to go back and sketch the house next door to this one from the side, which has a very cool chimney detail. I’m going to have to get out there at least an hour earlier, though, so the light will be just right.

I know I promised to show the many traditional architectural styles in Maple Leaf. . . but I sure love these Tudors!

Wednesday, April 25, 2018

Craftsman

4/23/18 Maple Leaf neighborhood

The American Craftsman style of architecture is common in the Maple Leaf ‘hood. Before we added an upstairs, our frame house looked very much like this one – simple details and a small porch flanked by plain, round columns. Greg calls this type “the poor man’s Craftsman home,” as we’ve certainly seen much larger ones with exposed rafters and big porches. If I’d had my choice back when we were house hunting eons ago, I would have picked a brick Tudor over a Craftsman, but I do like the clean, classic look of this house (and ours).

I think Reckless Video, which I sketched several years ago, is also in the Craftsman style.

Tuesday, April 24, 2018

Big Yellow Bugs

4/22/18 Roosevelt Way NE in Maple Leaf

On Sunday afternoon I took a walk in the sunshine through the neighborhood. My goal was to make note of architectural styles that I want to sketch for my series on Maple Leaf houses. I didn’t get very far, though, because I found this pair of excavators, which look like yellow praying mantises, resting on Roosevelt Way. Somehow heavy equipment is always more seductive than houses.

By the way, despite the sunshine, those trees behind the excavators were still as bleak and bare as winter. Id feel more confident that spring were really here if all the trees were leafed. Maybe this weeks expected warm temperatures (77 on Thursday?!) will help.

Monday, April 23, 2018

Conical Tudor

4/20/18 Maple Leaf neighborhood

Last week when I started to criticize a new house under construction for not fitting in with our neighborhood’s architectural style, I realized I should let you judge for yourself by showing you some of that style. This is the first of what I intend to be a series of sketches of typical home styles in the Maple Leaf neighborhood.

This is one of my favorite houses on our street. I walk by whenever I catch the bus, and I always admire that lovely conical-shaped roof over the porch which gives it a storybook cottage look. Thirty years ago when we were house hunting in the neighborhood, we hoped to find a Tudor-style house like this, but there weren’t any available in our price range. It looks serene, doesn’t it? However. . .

Just behind me as I sketched next to a huge dumpster, a house was being totally gutted by several men who were shouting to each other as well as into their phones (set on speaker) while music blared from a radio. Every now and then that cacophony was further punctuated by a pneumatic hammer. Someday I’ll sketch what’s going on over there, too.

Sunday, April 22, 2018

Sketchin’ and Chillin’ with Andika


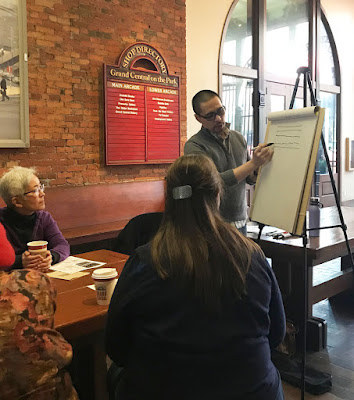
Andika shows us how he makes confident lines.
(Photo by Jane Wingfield)
“Sketch ‘n’ Chill,” the title of Andika Murandi’s USk Seattle 10x10 workshop, is irresistible: Who doesn’t enjoy sketchin’ and chillin’? And the subtitle is even better: “No-stress interior sketching.” I’ve long admired Andika’s sketches of interior spaces that convey depth and complexity and yet stay small and simple. His workshop would be a good opportunity to learn his approach. I signed up immediately!

For the first half of the workshop, we met in Pioneer Square’s Grand Central Arcade, where Andika led us through practicing the very basics of any kind of drawing: making bold, confident lines instead of jaggy, tentative ones. By moving the whole arm and shoulder, not just the wrist, even when drawing in a small sketchbook, lines will be more controlled, continuous and consistent.

He urged us to forget about erasing tentative pencil lines; instead, he encouraged going straight in with ink and “embracing the mistake.” To reinforce this attitude, he showed us examples from his own sketchbook where he had made incorrect lines initially and then restated them, but left the old lines in place. When he pointed them out, we could see the “wrong” lines, but they otherwise disappeared into the rest of the composition, which was confidently presented.
 
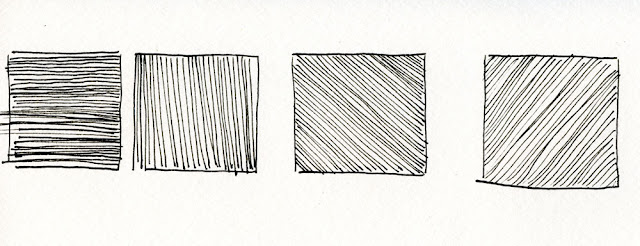
Line-drawing practice
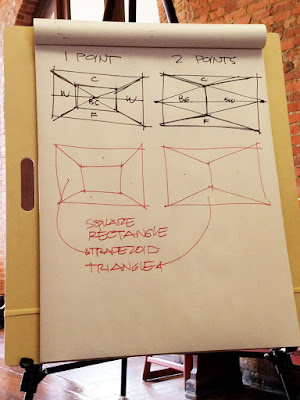
Rooms can be simplified into trapezoids, rectangles and triangles.

As an architect, Andika pays attention to perspective in his sketches, yet with a casual, “no stress” approach. Most traditional lessons in perspective drawing begin with illustrations of one-point or two-point perspective in which the point where all those lines meet might be way outside the composition and halfway down the street. Instead of starting with a horizon line and vanishing point, he showed us how interior spaces can be simplified into rectangles and trapezoids (one-point perspective) and triangles and trapezoids (two-point perspective). Once you see those basic shapes in a room and form a composition around them, the rest is just details. Stress-free perspective!

With those lessons and line exercises under our belts, we proceeded to our first sketch within the Arcade’s large interior. I chose the two-point perspective of one of the main doorways somewhat complicated by the stairwell in the center of the room. I initially got the height of the stairwell wall wrong, but I drew the lines confidently and left them boldly in place. 😉
 
4/21/18 Grand Central Arcade

True to his personal philosophy of relaxing with a beverage and sketchbook in a café, for the second exercise we split up into two groups, each going to a nearby coffee shop. I was in the Caffe Umbria group, and I went to a back corner of the café. I again chose a two-point perspective looking toward the front of the room. (I was planning to “chill” with a mocha as Andika would do, but learning to draw always makes me hungry! I sketch ‘n’ scarfed a grilled veggie sandwich.)
 
4/21/18 Caffe Umbria

Before taking this workshop, my usual approach would have been to focus first on the two men sitting in front of me, then add the roaster, tables, chairs and other details around the men, and finally fill in the windows and walls in the background. But often what happens is that my scale or placement is off on the tables and chairs, so when I put in the walls and windows behind them, the whole room tends to skew. With Andika’s approach, the first lines I made were the shapes of the trapezoids and triangles of the walls, ceiling and floor. Although I probably didn’t get the perspective perfectly accurate, when I used those lines to guide the placement and scale of the details, they tend to look right.

Similar to Gabi’s “Pocket Urban Sketching” concepts or Sue Heston’s “sky shapes,” both learned in last year’s 10x10 workshops and that I find myself using often, Andika’s simple, straightforward approach is one that I could grasp easily in an hour and then practice immediately for reinforcement. I left the workshop feeling confident that I could use his approach for interior spaces whenever I want to show the whole room – without thinking about where all those perspective lines eventually meet up. Sketch ‘n’ chill, indeed!
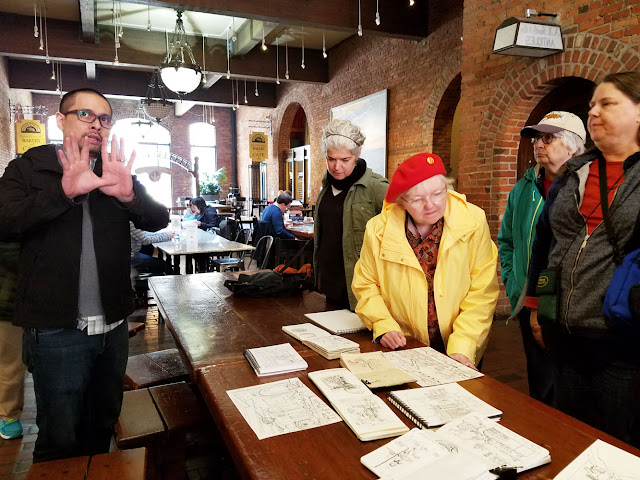
Final throwdown
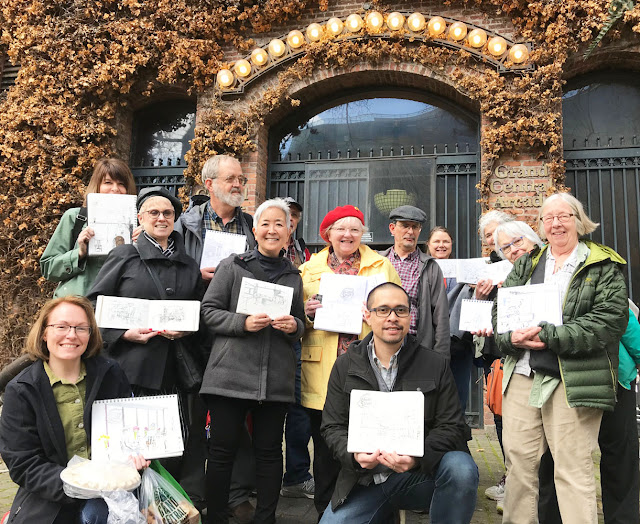
A stress-free group! (Photo by Jane Wingfield)

Saturday, April 21, 2018

Big Scene, Small Page

4/19/18 6th & Lenora sketched in a 5 1/2" x 7" Field Notes notebook spread

Whenever I’m in the South Lake Union area, it’s hard to resist the Amazon Spheres. I’ve sketched them inside and out several times, but I’m still not tired of them.

A few days ago I met Gabi Campanario for a working lunch (we’re both members of the USk Editorial Team) by the spheres. After the meeting I stood near the same spot where I sketched this scene while taking Gabi’s Pocket Urban Sketching workshop last year. Before then, I’d always had difficulty viewing a vast scene like this and fitting it all onto a small page. A couple of simple yet important tips – such as using the vertical line of a building as a measuring unit to gauge the rest of the composition – made the task far less intimidating. I still use those tips every time I am faced with a scene like this.

Sunshine at the Spheres!

Friday, April 20, 2018

Vintage Colored Pencils, Part 11: Rexel Cumberland Derwent

Vintage Rexel Cumberland Derwent pencils

In the first chapter of The Pencil Perfect, author Caroline Weaver talks about the discovery of graphite in the 16th century in England’s Lake District. Though numerous pencil manufacturing companies were in the area at one time, the only one still remaining is Derwent. The company even has a museum for pencil aficionados – The Derwent Pencil Museum in Keswick – which is home to the world’s largest colored pencil (26 feet long)! Derwent obviously has a long, proud history in pencil production.

According to Wikipedia, the company we now know as Derwent began in 1832 under the name Banks, Son & Co. The company was eventually purchased by Acco UK (known then as Rexel) and became a brand of their product range. This company would pass through several hands before becoming the Cumberland Pencil Company in 1916.

A huge, lovely set of vintage Rexel Cumberland Derwent pencils recently came my way  a generous gift from someone who knows that I eat and breathe colored pencils. I contacted Derwent to see if I could learn approximately how old my set is, but I didn’t get a response. But I found at least three versions of branding in the hefty collection.

3 styles of branding

Interestingly, one is Derwent Artist, which is still the name of a Derwent pencil line, but the contemporary Derwent Artist pencils I have tried are much harder than these.

Derwent's contemporary Procolour
Compared to Derwent’s vast range of contemporary colored pencil lines, these Rexel Cumberland pencils have a very different appearance. For example, the contemporary Inktense, ColourSoft and Procolour (at right) lines all have a solid-colored round barrel with only the end caps indicating the core’s color. This design is consistent with all of Derwent’s current collections. On the vintage Rexel Cumberland pencils, however, the full length of the round barrel matches the core’s color, and the end is unfinished. It looks very similar to Prismacolor’s long-standing design.
 
Unfinished ends on the Cumberland Derwent
Enough about design; we all know that the most important aspect of any pencil is its core. When I initially swatched these, I was astounded by how deliciously soft and creamy they are. They are probably as soft as any colored pencils I own, including Caran d’Ache Luminance and vintage Berol Prismacolors. In fact, I’d say they are most similar to my old Prismacolors in softness, application and even appearance.

My curiosity immediately led me to trying to figure out which contemporary Derwent line was the successor to these very soft Cumberlands. ColourSoft and Derwent’s newest Procolour line were the likeliest candidates. They all have a 4mm core. ColourSofts feel slightly drier than the Cumberlands and also produce more dust. The Cumberlands are close to Procolour in softness – perhaps even slightly softer and with a creamier texture.

(An aside: I’ve long been flabbergasted by the number of colored pencil lines Derwent currently has in production – I counted 10 on Blick’s site. Procolour, ColourSoft and the limited-color-range Drawing line all are close enough in performance that only a geek making side-by-side comparisons on a rainy afternoon would be able to distinguish them. I’m not complaining, mind you – more for geeks like me to ponder – but it’s perplexing, nonetheless. Next time I’m in the UK, I must make a pilgrimage to that Derwent museum and discuss these questions with them myself.)
 
4/1/18 Cumberland Derwent pencils in Stillman & Birn Epsilon sketchbook 
For my apple sketch, I used a smooth Stillman & Birn Epsilon sketchbook. As I expected from initial swatches, the Cumberlands blend beautifully, and it’s easy to build up layers of rich color. They are the kind of pencils I like to use at life drawing, so I grabbed several and took them to Gage a few days ago, where I used them on all the 10-minute and longer poses.

I don’t know how long these Cumberlands have been out of production, but despite the number of similar pencil lines the company now makes, none of them is exactly the same as these. Thanks, Ana – I’m very happy to have and use them.


Updated 10/29/21: A while back, Jane Blundell gave me several vintage Derwent pencils that were used by a family member in the 1950s (below)!


A spring bouquet!

Thursday, April 19, 2018

New Construction

4/18/18 New house in Maple Leaf

A new house is under construction a block away from mine. This is the same construction site where I sketched an excavator a couple of months ago. My plan was to sketch more of the various types of heavy equipment I’ve seen on the property the past several months, but most of that occurred during our long stretch of cold and rain, and parking wasn’t allowed nearby, so I missed all of that.

Yesterday it finally warmed up a bit, so I took advantage of the dry day to sketch the site. I’ll reserve final opinion until the house is completed. For now, let’s just say that based on what I can see of this elevation, the house doesn’t quite fit the rest of the neighborhood.

But how would you know? Other than The Maple Bar and Reckless Video, both neighborhood businesses occupying traditional houses, I’ve hardly sketched any houses in my ‘hood. I suppose familiarity breeds contempt or at least invisibility, because I don’t really “see” the houses I pass every day (or for that matter, the one I live in). I’m going to remedy that. Now that it’s finally feeling more like spring, I’m going to start sketching some of the homes that are what I consider typical and traditional of this area. Perhaps by then this new house will be done, and you can decide for yourself whether it belongs in Maple Leaf.

Wednesday, April 18, 2018

Training for Lightning Sketches

4/17/18 1-min. poses

Yesterday when I wrote about lightning sketches, I totally forgot to mention one of the best ways to train for them: life drawing.

My primary motivation for going to figure drawing sessions is that the regular practice strengthens my eye and hand for human gestures and proportions, which is very helpful when I’m sketching people “in real life.” Of course, drawing a posed model who is absolutely still for one to 20 minutes is a total luxury compared to drawing “real” people, who tend not to hold poses at all (unless they’re busily preoccupied with their devices). I think the greater benefit, though, in terms of teaching me to sketch faster, is that I become more adept at gauging how much of a sketch I can do in a given amount of time.

Shown here are a few sketches done from one-minute poses (above) and two others from two-minute poses (below). There’s not much difference in the amount of detail I included, yet I used the full length of time in each case. During the one-minute poses, I’m moving my hand and arm as fast as possible and sometimes I don’t get all of the model’s limbs, but I at least try to complete the gesture so that it’s clear what the model was doing. During the two-minute poses, I’m doing the same thing, but I can move my hand and arm a little more slowly, hopefully gaining a bit more accuracy in proportions. With two minutes, I am able to get all the limbs in, and the gesture is always complete. They don’t look very different, but from regular practice, I have trained myself to know how much slower I can draw (twice as slow!) when I have two whole minutes compared to one. I also always choose a brush pen for these very short poses because a liquid medium is easier to move quickly compared to a dry one.

4/17/18 2-min. poses

Shown below are sketches made from 10-minute and 20-minute poses. With these time lengths, I can choose a slower medium (colored pencil), put in a bit more detail, and define the forms more completely through shading and highlights. In both poses, I used the full amount of time for each, so I should be training myself to know how much of a sketch I can make in those time spans. But am I?

4/17/18 10-min. pose
4/17/18 20-min. pose
Having 20 minutes is downright leisurely, both at life drawing and in “real life” drawing, and lately I have developed the bad habit of overworking a 20-minute sketch beginning around the time a 10-minute one would have ended. A 10-minute pose seems to be my sweet spot for capturing proportion, gesture and form. I could just stop after 10 minutes and start a new sketch to fill the time slot. But Id rather learn how to make a stronger 20-minute drawing.

Today’s insight: Maybe I’ve gotten so good at sketching at lightning speed that I dont know how to sketch more slowly! This is definitely something to work on.

Tuesday, April 17, 2018

More Reasons for Lightning Sketches

4/12/18 Mercedes in the post office parking lot

Several years ago I posted about the necessity of making “lightning sketches” when sightseeing with people who aren’t sketchers. I don’t want to keep companions waiting, so I’ve figured out strategies for sketching very quickly. Keeping materials, compositions and subject matter simple is a primary strategy, but just as important is adjusting one’s expectations and, when possible, planning for potential opportunities.

Recently I started thinking about all the many day-to-day situations (or to look at it a different way, opportunities) in which lightning sketches are necessary – not just when I’m with others whom I don’t want to keep waiting. When I think my subject matter may depart (people, animals, cars) or change (natural light, weather conditions) at any moment; when I’m due somewhere and have only a moment or two to spare; when I’m waiting for something else to happen, and once it happens, my sketch time is over. These types of situations happen way more often than having a leisurely few hours to spend as long as I like on a sketch.

One day last week was filled with opportunities like that. First, I went to the post office, and I had only a few minutes before I needed to run the next errand, but I thought I’d sketch a car in the parking lot. When I arrived, I backed into my space (planning) so that I’d be facing toward other cars when I finished my postal business. I knew the driver of the Mercedes would return from the P.O. quickly (indeed, he did – immediately after I finished).
 
4/12/18 Space Needle
Right after my errands, we were destined to see an exhibit at the Museum of History and Industry. The show was almost all photography, so I figured I wouldn’t have much to draw in there, but I wanted to find a way to squeeze in a sketch or two. The first opportunity came right after we’d ordered lunch in the museum’s café. It doesn’t take long to grill a couple of sandwiches (and you know me – I can’t sketch if I’m hungry and food is on the table!), so I didn’t have much time, but it was enough to capture the Space Needle (still looking top-heavy due to its remodeling, which has grown tiresome to a native like me) through the window. As soon as the sandwiches arrived, I decided I was done.

Before we left the museum, Greg stopped in the men’s room, so I looked around nearby. I’ve made leisurely sketches of the bright pink Lincoln Toe Truck on multiple visits to MOHAI, so it wasn’t new to me, but it’s always a favorite. Again in my pocket-size Field Notes, I lightning-sketched that giant mobile foot and even had time to scribble on some pink by the time Greg was ready.
4/12/18 Lincoln Toe Truck, MOHAI

One of my favorite ways to flex my lightning-sketching muscles is watching the view out our kitchen window. Our bird feeder has been endlessly entertaining as well as endlessly useful in training my eye, hand and visual memory. Unlike the others (which took, literally, a few minutes each to complete), the sketches of birds shown below took quite a bit longer in total duration – each was completed over the course of several days – but I’d guess that the total amount of time spent on each sketch was still only a few minutes. These finches would give me a few seconds at a time, so I’d grab whatever gesture I could, from sight and from memory. The next time I saw the same bird (or another just like it), I’d correct the gesture or add more detail.

I remember when I first started sketching more than six years ago, I marveled at how quickly other sketchers seemed to work and wondered whether I would ever be as fast as they are. Over time, I have gotten faster and faster, although I don’t know how I’ve developed this skill other than through regular practice. When I have time, I enjoy working on a compelling subject, a more complex composition or more details, but I like having the choice of being quick if I need to. Regardless of subject matter or the reasons for being fast, my lightning-sketching skills are useful and worth continual honing.

4/4 through 4/12/18 finches at our feeder

Monday, April 16, 2018

Westlake Station and the Monorail

4/15/18 Westlake Station platform level

Westlake Station, in the middle of downtown Seattle’s retail corridor, is also the hub of the city’s public transportation system. You can catch buses and light rail trains from this station. You can walk over to Westlake Center and hop on the Monorail. Or you can just stay and shop.

Despite all that is going on there, it took me a long time to find a composition I wanted to sketch. Maybe I was just feeling picky, but everything inside the station seemed too dark, too plain, too fancy or just too difficult. I started questioning why we picked this location for a USk Seattle outing! Finally I leaned over every railing that looked down on the platform level to find a view where two women were waiting for the train.

4/15/18 Fifth and Pine


After wandering around the station a bit longer, uninspired, I zipped up my jacket (thankfully I wore my down) and went out to the street. Lending light but not much warmth, the sun appeared occasionally. On the corner of Fifth and Pine, I found a street scene I wanted to capture: The Monorail and the round twin towers of the Westin Hotel (plus a lot of scaffolding that seems to be marring much of the view in this area). With all the buildings that have been popping up (as well as torn down) over the past decade and especially the last few years, at least those two icons haven’t changed much since I was a kid. This is the kind of scene I would be attracted to if I were a visitor here, yet I take it for granted because it’s familiar.


Sunday, April 15, 2018

Jane’s Workshop Captures People at the MarketFront

4/14/18 Kay focuses on people, not the pig, in Jane's workshop.

On a drizzly morning mobbed with the usual Saturday crowds, the Pike Place Market’s MarketFront sheltered Jane Wingfield’s 10x10 USk workshop students as they sketched people “inside-out.” Eavesdropping on Jane’s lessons and demos as I snapped photos and sketched her students, I found myself almost unconsciously following her principles: Focusing on essential lines of action and drawing in a fluid manner to capture gestures and movements.

4/14/18 Jane and her students hard at work.
An interesting and useful exercise Jane used was to hold a pose (see photo below) for several seconds as students sketched her. When she no longer held the pose, they were to continue finishing the drawing from memory – an essential skill to develop when sketching anything that moves constantly (I try to do this frequently with people as well as animals). She told me later that she gives her students this exercise because most people in public places like the Market are not making a wide variety of poses other than milling about or standing.

4/14/18 Queued up for piroshky

Stopping for a quick bite at Michou Deli, I grabbed a stool at the windows looking directly out onto the sidewalk, where a long line of people waited their turn at Piroshky, Piroshky. Queuing people usually aren’t very active, but I still tried to capture their individuality by focusing on their posture. If you observe closely, there’s a line of action (or inaction) even when people are doing nothing but standing.


Jane holds a pose for a few seconds so that her students
can keep it in memory and continue drawing after the pose is gone.
Related Posts Plugin for WordPress, Blogger...