Showing posts with label DIY planner. Show all posts

Tuesday, June 14, 2016

Simplify, Complicate: My Multi-Book Life

My many daily-use books. From left: Field Notes for memos, DIY journal/log book
(Rhodia notebook), DIY planner (Leuchtturm notebook), hand-stitched signature
for most of my sketches, red Field Notes for more sketches
Some things get simpler even as others get more complicated.

Years ago before I had started sketching, I saw the sketchbooks and art journals of Roz Stendahl, Cathy Johnson, Liz Steel and Danny Gregory (among many) and so admired the way they artfully integrated their words and sketches on the same page. I loved the idea of making a book containing the “story” of my daily life in both words and pictures. As a lifelong journal writer, I was used to filling pages with words, but making pictures on the same pages felt like stilted, self-conscious add-ons. I tried it off and on, but the practice never lasted. (It further convinced me – falsely– that I must be a “word person” and not a “visual person.”)

When my urban sketching habit finally took hold, I had no problem filling sketchbooks (even when one cost $160!) – I burned through page after page without hesitation. But whenever I tried to write and sketch on the same page, both the writing and the sketch felt tight, restricted, uncomfortable. If I could both write and sketch with ease, why was doing both on the same page so difficult?

A minor reason was incompatible papers. I don’t like writing on thick, toothy paper that I prefer for sketching. While I enjoy using a fountain pen to sketch with, I write much faster than I draw, and the slight drag of the nib on cold-press paper when I’m writing annoys me. I also don’t like using wet media on thin, smooth paper that I prefer for writing.

But the more significant reason is related to privacy: I want to share my sketches but I have no intention of sharing my journal writing. If I put a sketch online, I don’t want to have to digitally blur the writing surrounding an image. If someone asks to see a sketchbook, I want to be able to hand it over without hesitation. And most important, I don’t want either my writing or my drawing to be hindered by whatever else might be on the same page.

My DIY planner
Once I understood this, I accepted that my sketchbook would never be the words-and-sketches kind I admired of others – and that it was perfectly fine to have a separate book for each task. But that’s when things got complicated.

For the past several years, my planning and journal keeping processes have become more and more streamlined, and I’ve gotten them down to two A5-sized notebooks that I’ve DIY’d into a planner and a journal/log book. So at least my writing life has gotten simpler. (Oops, I forgot about my occasional travel journal. . . more on that later.)

My sketching life, however, has gone both ways. After experimenting with many sketchbook sizes, types and formats and using several simultaneously, the past three years I’ve been very happy binding my own in a single consistent format – apparently the only way to get everything I want. That simplified my primary sketchbook need beautifully. But I’ve also always had a secondary need – a smaller, catch-all sketchbooklet that I could pull out quickly and use with simple materials. After going through nearly every commercially produced pocket-size notebook, ranting about the crappy papers in them, I finally resorted to the same DIY solution: making my own.

Field Notes Workshop Companion: Just right for both sketches
and notes.
For a while I was happy with those – a large and a small sketchbook, both portable, both handmade. Then last summer I stumbled upon a surprise: Field Notes finally came out with an edition containing paper I could happily sketch on. I started using the Workshop Companion for small sketches as well as memos and other brief notes when I’m out and about; I was able to eliminate the small scratchpad I used to carry for brief notes. And I decided I liked the Workshop Companion well enough that I wouldn’t have to make my own sketchbooklets anymore.

Then a few months ago Field Notes surprised me again – with the Sweet Tooth edition’s booklet of red paper! You know from my recent sketches how much fun I’ve been having with those (I’ve filled three so far, and I’m on my fourth). I may eventually go back to white or lighter colored papers, but in the meantime, I’ve bumped up against another complication. Since the red paper is a little too dark to take notes on easily, I’ve had to start carrying an auxiliary notebook just for memos again. One step forward, two steps back.
Messy notes and sketches in my auxiliary Field Notes.

And then there’s still the occasional need for a travel journal, which is currently being met by a pocket-size Rhodia notebook. When I travel, I leave my planner and journal/log book at home, so the pocket Rhodia serves both those needs. It holds not only my written musings; it also contains reference information; glued-in ticket stubs and other ephemera; even some sketches. (Interestingly, my travel journal comes closest to the fully integrated words/collage/drawings book I’d always wanted – and what a beautiful mess it always ends up being!)

Just recently I started pondering whether I could use red or Workshop Companion Field Notes instead of the Rhodia. . . ? One Field Notes is certainly slimmer and easier to carry than the chunky Rhodia, but I’d need four of five of them to match the number of pages I typically fill in a Rhodia. Can I stand having all those separate books for one trip? (The one with reference info I need will inevitably be the one I happen to leave back at the hotel.)

My France travel journal filled with writing, sketches and
collage (pocket-size Rhodia notebook).
Some things get simpler even as others get more complicated. 

Saturday, December 13, 2014

A Six-Month Follow-Up on My DIY Planner and Journal/Log

A freshly made planner on top of the used one.
It’s been nearly six months since I started using the planner and the journal/log book that I made myself from standard notebooks. (Click the links in the previous sentence to review my initial motivation for making them.) Although the impetus was sketchbook-inspired, the ways in which I use the books themselves are not related much to sketching, so I’ll indulge only briefly here to follow up on how they are working out for me.

In short, I love them! I enjoy using them every day. They suit my needs ideally – no compromises based on a manufacturer’s template.

The planner didn’t require much adjustment on my part – it’s the same two-page-per-week, A5-size format I’ve been using for the past few years. On each weekly spread, I keep appointments on the left and a to-do list on the right. Longer-term planning goes on a monthly grid calendar in the back of the book. (This used to be in a separate calendar previously; I really like now having the weekly planner and the monthly calendar in one book.)


Glued-in reference items.
A small section of blank pages falls between the weekly planner pages and the monthly calendars. I wasn’t sure how I’d use these pages – I had initially thought to write long-term goals or other notes – but I wanted anything I put there to be relevant only for the year so that I don’t have to keep referring to an old planner once the year is over. I ended up using the pages to glue in small paper items that tend to sit on my desk but are prone to getting lost, such as Gage’s drop-in life-drawing schedule (cut from their catalog), business cards and coupons. (I use Tombow Mono Removable Tape Glue on coupons so they can be taken out easily.)

Weekly log pages, filled and empty.

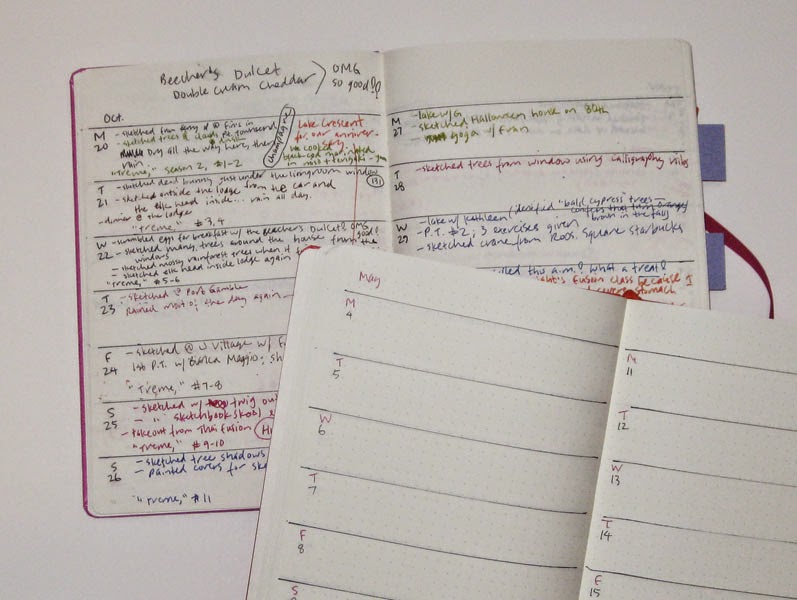
The journal/log book was a slight change in format in that the two are now combined into one A5-size book lasting six months (I used to keep my log in a pocket-size notebook, and the journal was a separate A5-size book). I like having more space for the log in the first 26 pages of the book – about an inch of vertical space across the page for each day. I record things I’ve sketched, seen, eaten, read, heard and otherwise experienced that day. It’s just a list – no commentary – as the latter goes into the remaining freeform pages of the book. If I wrote in the journal about something noted in the log, I put a page number in the log for easy reference (the pages of the Leuchtturm notebooks I use are prenumbered). It looks like I’ll probably have a few pages leftover in the volume at the end of the year, which is fine (better than running out of pages, which would raise my hackles!). I’ll start the new year with a fresh volume.

You’ll note that there’s nothing pretty about my planner, journal or log pages; I’m not into stickers or washi tape. My esthetic awareness in these mostly functional books is limited to using fountain pens. (But that’s probably where I go overboard: I currently have 14 fountain pens inked up with a rainbow of ink colors – and that’s not even counting the pens I sketch with!)

2015's planner and journal/log are
made from Leuchtturm notebooks with
a dot grid page format.
I used a rainy afternoon last month to make my 2015 planner and my journal/log for the first half of 2015. The only change I made was to use dot grid notebooks for both. I found the grid ruling in the Moleskine book I used for my planner to be a bit too dark and obtrusive. The log/journal I’m about to finish has blank pages, which is my preference for writing, but the DIY ruling goes a lot faster when I have the dots as guidelines. And the Leucchturm dot grid ruling is pale enough to be unobtrusive.

Is there anything more satisfying than starting the year with a fresh, blank journal and planner?

Maybe only ending the year with a fully used sketchbook.

Update: See my review at the Well-Appointed Desk about how I make my log now.


Journal page of a visit with
family in L.A. . . .
. . . testing a paper with various
pens. . .
. . . restaurant review.

Wednesday, June 4, 2014

Sketchbook-Inspired Digression, Part 2: My DIY Journal

A few recent journals. I have trunkloads of more spanning nearly 50
years of journal keeping.
As I mentioned in Part 1 about my sketchbook-inspired DIY planner, I’ve been a lifelong journal keeper. Although I’m now far less verbose than I used to be in my teens, 20s and 30s (I obsessed about everything back then – in writing!), and although I don’t necessarily write daily, I still manage to fill several pages a week with observations, ruminations, clippings, ephemera and whatever. Like my planner, my journal’s format and size have varied widely over the years. Most recently, I’ve been using a Moleskine or my current favorite Leuchtturm notebook in an A5 (about 5 ½” x 8 ½”) format, and it takes me about six months to fill a volume.

In a separate calendar, I also keep a “log” to track things like heron sightings at Green Lake, the first blossoming trees or turned leaves, unusual weather and other natural events, books I read, movies we see, restaurants and new foods we try, places I’ve sketched at – things like that. This is a separate calendar from my weekly planner because its purpose is documentation, not scheduling. However, all my afore-mentioned annoyances with commercial calendars and planners – especially Saturday and Sunday mushed together into one space – still apply.
My DIY semi-annual journal/log book (biweekly log pages shown).

Around the time I started thinking about my DIY planner, I also started thinking about this “log” book, my journal and how I might simplify and consolidate both. I knew a year’s worth of my journal writing wouldn’t fit into the available pages in a year-based planner. But since I fill a standard notebook in about six months, I started thinking that I could divide the year in half and consolidate the log and the journal. . . Voilá! My DIY semi-annual journal/log was born.

I made six months’ worth of weekly pages at the front of a plain (unruled) Leuchtturm notebook (as with the planner, next year I’m going to use a dot-grid-ruled Leuchtturm to eliminate measuring). I put two weeks on each spread, taking up only 13 page spreads. Those pages are now the log.

Leuchtturm journal pages are pre-numbered.
All the remaining notebook pages are for freeform journal writing. An added benefit of the Leuchtturm notebook is that the pages are numbered (a feature I’ve never taken advantage of before). If I log an event that I’ve expanded on further in my written journal, I can easily note the page number in the log for reference. Formally indexing my journal has never been something I’ve felt compelled to do, but the Leuchtturm’s pre-numbered pages enable the log to serve as sort of a loose index of the journal – with hardly any additional work. Now that appeals to my inner journal-keeping geek!

While I can’t consolidate my planner, log and journal all in one volume, I’ve gone from four notebooks and calendars to two. And the best part is that they both serve all my needs exactly the way I want them to.

Updated 6/14/16: I made some minor tweaks to my journal/log book to give more space to each day in the log. I found that I was writing more brief "log" notes there rather than lengthy entries in the freeform pages. The balance seems to be working out just right for the six-month period. I just made up a new one for July - December in a Rhodia notebook, which has fewer pages than Leuchtturm. I'm going to have some pages leftover in the current book, though, so I think the fewer pages will come out about right.

My weekly log in a blank Rhodia notebook.

In case you're curious about types of things I log that aren't tied to specific dates, here are examples -- books I've read and inks in my fountain pens:

Book log

Ink log

What a geek I am!

Sketchbook-Inspired Digression, Part 1: My DIY Planner

My current planner, whose days are
now very numbered.
(This post will at first seem off-topic, but please indulge me, and you’ll soon see how it does, in fact, relate to sketching.)

Unlike so many people who have made the conversion to a digital or cloud medium to plan and organize their time, I still use an old-fashioned paper planner. Without getting into a discussion of the merits of paper vs. digital (the debate rages online if you’re so inclined), I’ll just say that I’ve used a variety of paper formats since I joined the workforce. The format has changed over time as my planning needs have changed. For decades when I had full-time meetings and tasks to manage, I used a two-page or one-page-per-day looseleaf format. During recent years as a part-time freelancer with a more flexible schedule, I’ve used a page-per-week format. The past few years I’ve used the Moleskine weekly notebook (shown at left), which has a handy facing page for to-do lists.

With all the formats I’ve tried or just thumbed through in stores, several things have routinely annoyed me:
A typical weekly planner page squishes Saturday and Sunday
into one space (Moleskine weekly notebook shown).

  1. Invariably, weekly page formats squish Saturday and Sunday together into one space. When I was working full time, my weekends were certainly as busy as the work week, if not more so, and that hasn’t changed. Every day of the week has the same number of hours – why not give all of them the same amount of space?
  2. Likewise, monthly calendar formats often make the last few days of the longer months “share” space because the calendar is designed on a 7-by-5 grid. What if you happen to have busy days on both the 24th and the 31st of the month – but those days get only half a square each?
  3. More and more, monthly calendars begin the week on a Monday. It’s fine if you’re used to this, but if you’re not, and you buy a calendar like that by mistake – havoc! (I’m way too old to make a mental shift like that, especially for something as utilitarian as a calendar.)
  4. A typical monthly calendar grid forces two days
    to share a space.
  5. Moleskine planners include a monthly calendar with a linear European format instead of the grid I prefer. The linear format can be useful for planning certain business-related tasks, but I’ve never liked it for getting a general overview of my month, so I always end up buying an additional gridded monthly calendar.

Stationery and art supply geek that I am, I often cruise the Internet for products and ideas. Seeing the popularity of the highly flexible, ever-customizable Midori Traveler’s Notebook system and its many copycats, I’ve been impressed by the creative solutions people have devised to make their planners suit their needs. Another inspiration for DIY planners has been the popular Bullet Journal. Heather, writer of the blog A Penchant for Paper, showed a DIY planner that combined a modified Bullet Journal with a traditional written journal. Laurie, writer of the blog Plannerisms, uses a modified Bullet system also and sometimes modifies her planner to serve her specific needs. (In fact, she even publishes her own line of planners.)

My DIY weekly planner made from a graph-ruled Moleskine notebook.
With all of these and other blogs as inspiration, I finally decided to stop letting planners tell me how to view my time and made a DIY planner for the second half of 2014. (Initially I was going to wait until 2015, but once I started thinking about this idea, my intolerance for all the ways in which commercial planners annoy me grew until I saw no point in waiting.) I used a graph-paper-ruled Moleskine notebook (at left) in the same practical size as the planner I’d been using (A5, or roughly 5 ½” x 8 ½”). The graph paper ruling eliminated the need to measure the gridlines and spacing – all I had to do was count the spaces. In my accuracy-challenged life, anything to avoid measuring is a benefit! In fact, I only had to count for the first page; the paper is translucent enough that on each successive page, I could use the lines I’d already drawn on the previous page as the guide. (For 2015, I’m going to use a Leuchtturm notebook ruled with an unobtrusive dot grid. I find Leuchtturm paper to be of better quality than Moleskine’s – and it’s fountain-pen friendly.)
My DIY planner's monthly calendar page.

Tabbed
monthly
calendar
pages.
The design is simple, yet it addresses all of the gripes outlined previously:

  • The weekly schedule page (shown above) is on the left – each of the seven days gets the same amount of space – and the blank page on the right is for my to-do list.
  • The monthly calendar (shown at right), with weeks beginning with Sunday, is based on a 7-by-6 grid, so none of the days has to share a space (an extra column on the right page can be used for notes).
  • For extra utility and coolness, I used sticky labels to make tabs on the monthly calendar pages (shown at left) so that they would be easy to refer to.
  • After all that, about half of the notebook’s pages remains blank, so I can use those pages for ideas, short-term goals and notes that I used to keep in other notebooks. (Any process that simplifies is a good thing!)

Next year I'm going to use this Leuchtturm
dot-grid-ruled notebook, which is less
obtrusive than graph-ruled notebooks.
(A lifelong journal writer, I write way more in six months than would fit in the remaining blank pages of my new DIY planner, so I’m still keeping a separate notebook for that. See Sketchbook-Inspired Digression, Part 2: My DIY Journal.)

It might seem crazy to make my own calendar and planner when purchased ones are so ubiquitous. But all it took was a ruler, an online calendar for reference and a little time (less than I imagined) on a rainy afternoon.

What does any of this have to do with sketching?


I’m probably long past the point where you wondered, “. . . now what does any of this have to do with sketching?” The answer is: my “Stefano” sketchbook system.

The "Stefano," my beloved sketchbook system.
A year ago when I was getting ready to attend my first Urban Sketching Symposium and experience my first major travel opportunity since I started sketching, I thought carefully about what I wanted and needed in a travel sketchbook and how store-bought sketchbooks weren’t meeting my needs. The Stefano, modeled after the popular Midori Traveler’s Notebook, was the result, and it met my needs so perfectly that I realized I didn’t want to reserve it just for travel – it became my everyday sketchbook system. It led me to binding my own sketchbooks, not just out of necessity but because I learned how satisfying it is to hand-bind volumes of my own hand-drawn sketches. Ultimately, the Stefano taught me that if something doesn’t quite meet my needs, I don’t have to put up with it, just because it’s what’s available in a store.

Life is full of little things that don’t quite meet my needs. I don’t have the skills to build custom furniture, “jailbreak” my smartphone or install another electrical outlet near my desk. But make my own planner? That I can do. And it now meets my needs precisely.

Many thanks to all the bloggers and others around the interwebs who continue to inspire me with their creative ideas.

See Sketchbook-Inspired Digression, Part 2: My DIY Journal.

Updated 6/14/16: Shown below is a tweak I made to my weekly page spread this year. I gave more space to each day, and instead of writing all the to-do's on the right-hand page, I write them on the appropriate day's space. Items that can be done any time during that week go in the larger space following Sunday. I like the Leuchtturm's pale dot grid much better than the Moleskine's dark grid.


Related Posts Plugin for WordPress, Blogger...