Showing posts with label spritzer. Show all posts

Thursday, May 25, 2023

Review: Derwent Spritzer


Who's got the best spritz -- Derwent or Honest?

I rely heavily on a water spritzer to activate trees and other foliage sketched with water-soluble pencils. It’s one of my most useful watercolor pencil techniques. I’ve tried many spritzers over the years, and my all-time favorite originally contained The Honest Company hand sanitizer. It releases a fine, reliable, mostly consistent mist that’s easy to direct and control. My only minor complaint is that it takes up more space than I want it to in my small, streamlined sketch bag, so I’m always looking out for smaller spritzers.

When I was placing my order for the new Derwent Inktense colors at CultPens, I spotted a spritzer that was being promoted as a useful support for Inktense pencils. Its slender profile looked promising, so I popped one into my shopping cart.

Indeed, the Derwent spritzer is the same height but significantly slimmer than my usual Honest Co. spritzer.

For my first test, I scribbled a couple of swatches with Caran d’Ache Museum Aquarelles in a Hahnemuhle Akademie watercolor sketchbook (below). I held the book about an arm’s length away and gave the top swatch two spritzes with the Derwent. Then I did the same with the lower swatch with the Honest spritzer. The Derwent put out a wetter stream that was a bit harder to direct.

Two spritzes each

In a real-sketch situation, I would wait a few seconds for the pigments to activate, then spritz again as needed. Shown below, right, is the result. I gave the Honest spritzer two more spritzes to get the amount of activation I wanted. I didn’t spritz the Derwent swatch again – it was more than wet enough – so what you see is the dried result of the two original spritzes.

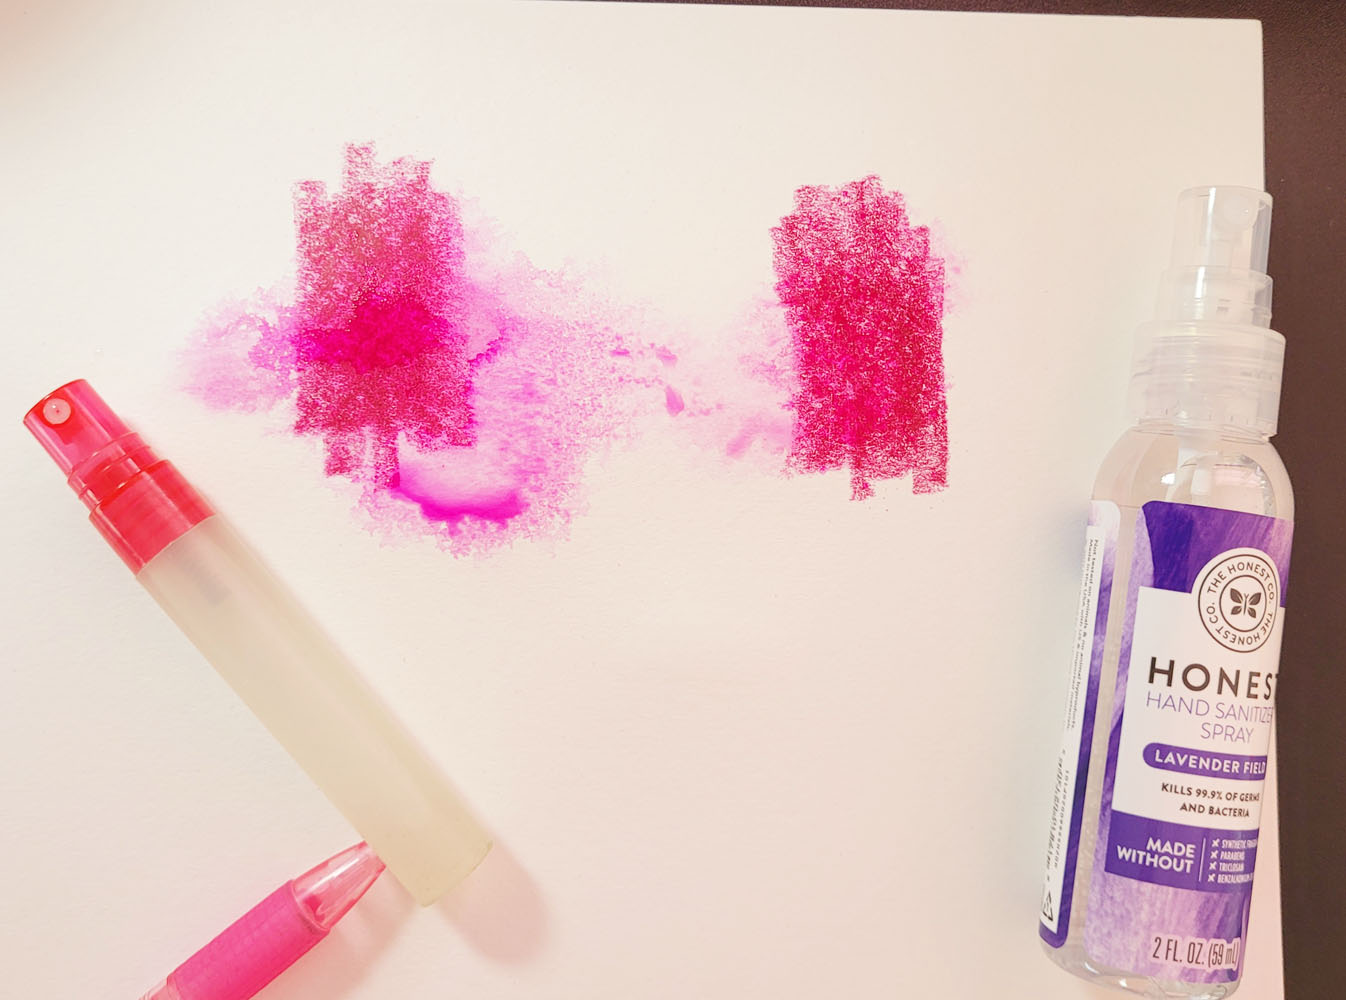
At left: Two spritzes from each spritzer, then dry pencil scribbled into each puddle.
At right: Spritzed dry swatches.

On the left, I spritzed the paper twice with each spritzer – Derwent on top, Honest on the bottom. Then I ran a dry pencil through each puddle. The results are similar, but the Derwent puddle is larger and spread out further.

Next I took it out on our back deck for some real sketches (which you saw in my messing-around post about Derwent Inktense Blocks). I used the Derwent for both sketches because they were relatively large areas being spritzed, so I knew there was less risk of over-spraying. It worked fine in these cases, but I’m concerned about smaller areas that I tend to spritz in my A6 sketchbook.

In these relatively large sketches, the Derwent spritzer worked out OK. 

Overall, the Derwent spritzer puts out more water per spritz than the Honest, so it’s more difficult to control; it’s easy to over-spray. However, its spritz is acceptably fine enough that I think I could learn to adjust my technique to accommodate it. I’m going to carry it around for a while and see if it works out long-term. (I’ll update this review as needed.) I definitely prefer its size as a daily-carry.

Saturday, April 30, 2022

Spritz on the Fritz


At left is one of many portable perfume atomizers I've tried. It doesn't work nearly
as well as the spritzer at right, which I'd been using for 5 years and needed to be replaced.

Let’s say some painters were about to be rescued from Gilligan’s Island, but the Skipper just ordered them to make the choice between leaving behind either their paints or their brushes. Which do you think they would choose? I think most painters would opt to lose the paints but hang onto their brushes. Most paints are easily replaceable, but high-quality brushes are pricey, and most likely the painter has spent quite a bit of time, trial and error acquiring their favorites. To replace their idiosyncratic set would be expensive and possibly time-consuming.

As much as I talk about my beloved colored pencils and rarely mention non-consumable tools, if the Skipper presented a similar dilemma to me, I would make the choice in a heartbeat: Give up my pricey but easily replaced Caran d’Ache Museum Aquarelles and hang onto my precious water spritzer! Having the right spritzer bottle is even more important to me than the waterbrush. I’ve tried lots and lots of travel-size perfume atomizers and other refillable spritzers, and none of them puts out the fine, consistent, accurately aimed mist of the one that has become essential to my sketching practice.

I’ve been using the same spritzer bottle for five years now. Unfortunately, the nozzle has developed a leak that is getting worse, so although it still spritzes, it also creates large drips that inevitably seem to land in the most undesirable spots on my sketches. Purchased at Target, the bottle originally contained hand sanitizer from The Honest Company. When the drip first developed, I started looking all over for it, even online, but I couldn’t seem to find it. (In retrospect, I wonder if this was related to searching during the height of the COVID hand sanitizer-hoarding period.)

A good spritzer, like the one that used to contain The Honest Company's  hand sanitizer at right,
makes a fine, even spray that results in an easy-to-control misting. The perfume atomizer gives
off a larger, unpredictable stream, which results in the wet puddle at left.

As the drip got worse, I searched again more recently, and this time,
I easily found it! I grabbed three, including one that was in a bottle with “a new look.” (That made me suspicious, but it didn’t hurt to give it a try.) The ”new” one was not an improvement, and I’m happy that the original bottle is the same and still the best.

The moral of the story: If you find a tool you would not give up, even when the Skipper gives you a dilemma, always go back and buy three more. (And now that I know that The Honest Company’s hand sanitizer can be found easily again for a few bucks, I’m keeping my pencils and will hand the Skipper my spritzer.)

Friday, September 11, 2020

Demo: Sequence for Spritzing Watercolor Pencil

Demo sketch

Several months ago when I sketched a peek-a-boo view of Mt. Rainier from our upstairs deck, I had enough forethought to take a few process photos that explained one method for planning the water-activation sequence when using watercolor pencils. The critical point is when I use a spritzer, which is my favorite way to activate foliage because it retains more texture and sparkle compared to dab, dab, dabbing with a waterbrush.

The issue is that it can be difficult to aim the spritzer accurately and confine the water to a targeted area. Adjacent parts of the sketch can be unintentionally sprayed, causing those details to become blurry when I want them to remain crisp (here’s an example of such a mishap). In the Mt. Rainier sketch, I used a waterbrush to activate the parts that I wanted to keep sharp and let them dry completely. Although activated watercolor pencil pigments are not permanent, they are far less soluble than dry pigments. When I spritzed nearby trees, the crisp areas were minimally disturbed.

That’s one way to keep the crisp areas from blurring. Another way is even more effective, but it takes more planning, which I don’t always remember to do. I explained the process a couple of days ago with the sketch of the North Substation tower, but I hope the steps below will be more thorough. This time I used the sketch with a tiny view of Green Lake that you saw on Wednesday:

Step 1 - block in: I like to use a Payne’s Gray Faber-Castell Albrecht Durer pencil for blocking-in because it’s harder and retains a point better than my usual Caran d’Ache Museum Aquarelles. As you can see, I don’t draw much with the initial block-in – just the large elements that I want to scale accurately to fit the composition on the page. (Sorry that the marks are difficult to see . . . I do the block-in very lightly.)

Step 1: block-in

Step 2 – draw tree and spritz-activate: I forgot to photograph this step, but instead, I’m presenting here the images I made for my workshop (which, sadly, was cancelled), which are probably clearer than any photos I could take in the field. Image 2A below is a tree drawn with dry pencil. In Step 2B, it has been spritzed just enough to activate the pigments while still retaining texture and sparkle.


Step 2A: dry pigment applied

Step 2B: spritzed

By contrast, shown below in image 2C is a brush-activated tree, which has lost most of its texture (this may be the look you want; I tend to prefer a more textured look). Image 2D shows what can happen if you are over-enthusiastic in spritzing – the pigments will float away in a messy puddle. Take care to spritz lightly, wait a moment for pigments to activate and settle, then spritz again if needed.

Image 2C: brush-activated

Image 2D: result of over-enthusiastic spritzing

A note on the spritzer: My favorite spritzer originally contained hand sanitizer, but it was purchased several years ago, and I can’t find the brand anymore. Ideally, use a spritzer that delivers a fine, even spray. Make some heavy swatches of watercolor pencil pigment and test your spritzer before using it on a sketch. You can vary the concentration of the spray by moving your sketch closer or farther away from the spritzer. I hold the spritzer about a foot and a half away from the sketch.

Step 3 – “licked” sky: I spritzed the sky area generously. Working quickly before the paper dried on this warm day, I “licked” pigment from the Museum Aquarelle Middle Cobalt Blue (660) pencil with a waterbrush and used the brush to apply the pigment to the wet paper. (This step is similar to the wet-in-wet technique with traditional watercolors.) I showed more details of the “licking” process in another demo a few years ago. The small refinement I’ve made in recent years is shown in the second image below: I’ve sharpened the pencil with a knife to expose as much pigment as possible, which makes the “licking” more efficient.

Step 3: pigment "licked" from pencil point with waterbrush and applied to wet paper.

pencil sharpened with knife to expose more pigment core

Step 4 – draw the main elements: While waiting for the sky and tree to dry, I drew the other elements, avoiding areas that were still damp. If you try to use watercolor pencils on paper that is damp but not glossy-wet, it’s truly unpleasant! The pencil point skids around without applying color, and if you rub too hard, you could damage the paper’s surface. If the pencil hits a slightly wetter area, it leaves a mark that might be unintentionally too bright. As with watercolor paints, it’s worth it to wait patiently. Note that distant foliage is left dry to keep them less vibrant and therefore in the background. By contrast, activation brings the closer tree forward.

Step 4: draw remaining elements, avoiding areas that are still damp

Step 5 – finishing details: After the sky and other areas were completely dry, I drew wires and other details.

Step 5: final details added

If you try this, please let me know how it goes and whether you like the results. This demo is similar to the one I wrote a few years ago except that I’ve improved and refined a few points.

9/4/20 completed sketch

Sunday, August 6, 2017

Maple Leaf Houses (Plus New Spray Bottle)

7/21/17 water-soluble colored pencils

Whenever I sketch at Maple Leaf Park, I find myself compelled to sketch the historic water tower that dominates the park and landscape. Since I sketch at the park so often, I decided I should find a different focal point once in a while. On this visit I ignored the water tower completely and instead sketched the houses and trees on one side of it.

The Honest Co. hand sanitizer spray bottle
Technical note: For my spraying technique, I had been using a tiny travel-size perfume atomizer. It works well enough (it made it onto my Top 10 last year), but I’ve been looking for one with a finer mist. Shortly before we left for Chicago, Greg was shopping at Target for travel-size products and picked up a bottle of hand sanitizer, thinking it might work for my sketching needs. I cleaned it out, and sure enough, it puts out a wider but finer mist than the perfume atomizer I had been using. 

This was the first sketch I tried with the new spray bottle. The trees got a little blurry because I was holding the nozzle at the same distance that I used to hold the tiny atomizer, which is too close for the new bottle’s wider but finer output of water. I get the best results when I hold it about an arm’s length from the sketch.
Related Posts Plugin for WordPress, Blogger...