Saturday, April 30, 2022

Spritz on the Fritz


At left is one of many portable perfume atomizers I've tried. It doesn't work nearly
as well as the spritzer at right, which I'd been using for 5 years and needed to be replaced.

Let’s say some painters were about to be rescued from Gilligan’s Island, but the Skipper just ordered them to make the choice between leaving behind either their paints or their brushes. Which do you think they would choose? I think most painters would opt to lose the paints but hang onto their brushes. Most paints are easily replaceable, but high-quality brushes are pricey, and most likely the painter has spent quite a bit of time, trial and error acquiring their favorites. To replace their idiosyncratic set would be expensive and possibly time-consuming.

As much as I talk about my beloved colored pencils and rarely mention non-consumable tools, if the Skipper presented a similar dilemma to me, I would make the choice in a heartbeat: Give up my pricey but easily replaced Caran d’Ache Museum Aquarelles and hang onto my precious water spritzer! Having the right spritzer bottle is even more important to me than the waterbrush. I’ve tried lots and lots of travel-size perfume atomizers and other refillable spritzers, and none of them puts out the fine, consistent, accurately aimed mist of the one that has become essential to my sketching practice.

I’ve been using the same spritzer bottle for five years now. Unfortunately, the nozzle has developed a leak that is getting worse, so although it still spritzes, it also creates large drips that inevitably seem to land in the most undesirable spots on my sketches. Purchased at Target, the bottle originally contained hand sanitizer from The Honest Company. When the drip first developed, I started looking all over for it, even online, but I couldn’t seem to find it. (In retrospect, I wonder if this was related to searching during the height of the COVID hand sanitizer-hoarding period.)

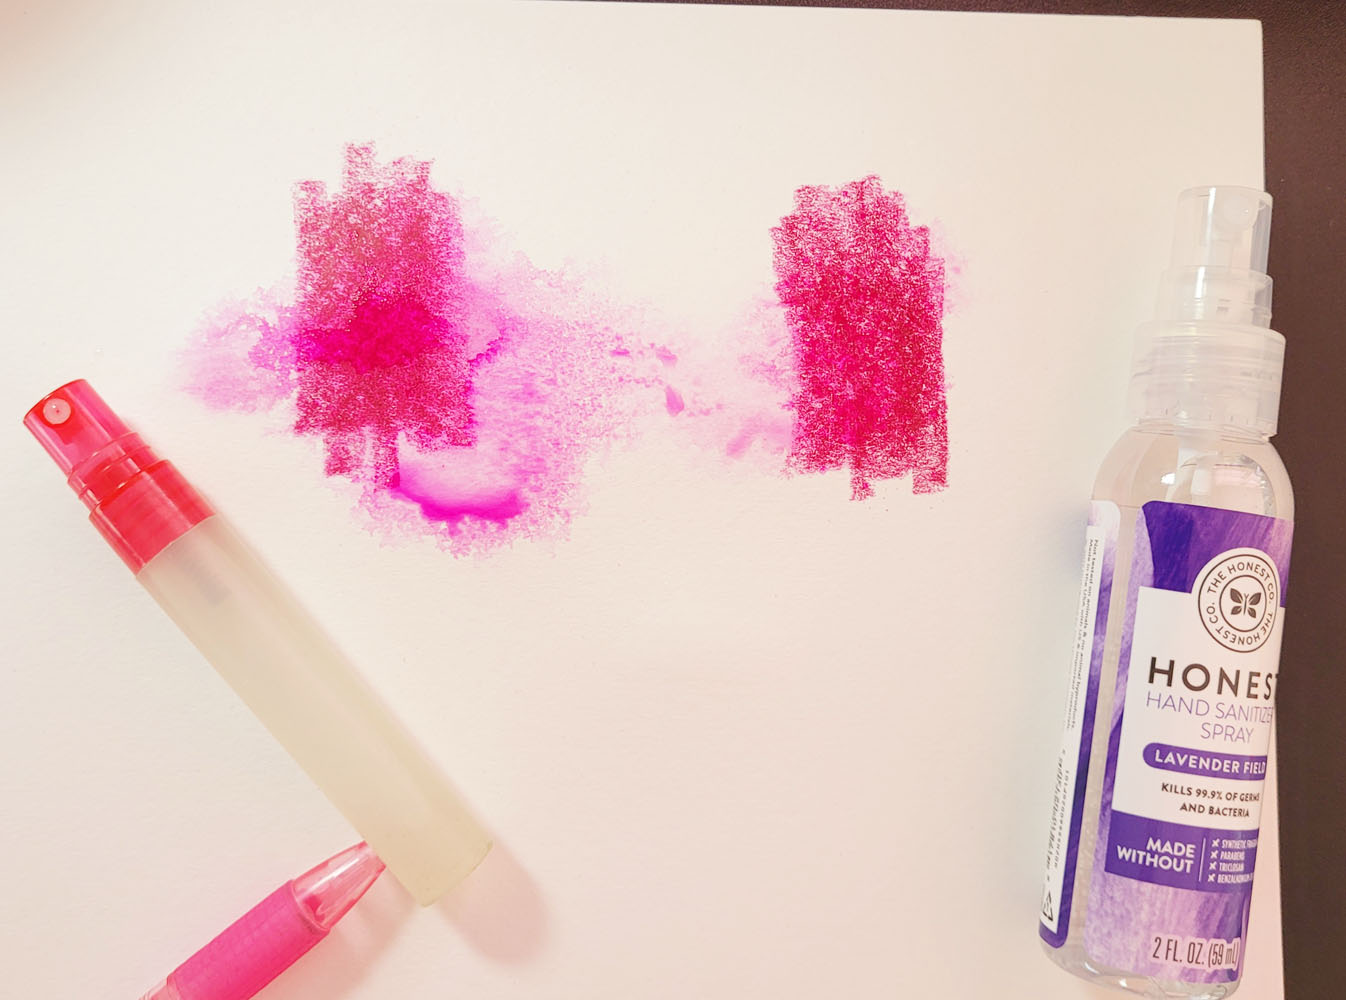
A good spritzer, like the one that used to contain The Honest Company's  hand sanitizer at right,
makes a fine, even spray that results in an easy-to-control misting. The perfume atomizer gives
off a larger, unpredictable stream, which results in the wet puddle at left.

As the drip got worse, I searched again more recently, and this time,
I easily found it! I grabbed three, including one that was in a bottle with “a new look.” (That made me suspicious, but it didn’t hurt to give it a try.) The ”new” one was not an improvement, and I’m happy that the original bottle is the same and still the best.

The moral of the story: If you find a tool you would not give up, even when the Skipper gives you a dilemma, always go back and buy three more. (And now that I know that The Honest Company’s hand sanitizer can be found easily again for a few bucks, I’m keeping my pencils and will hand the Skipper my spritzer.)

Friday, April 29, 2022

Café Pico’s Patio


4/22/22 Cafe Pico

Although it’s not quite patio weather yet, sketchers know how to dress in layers. Ching, Natalie and I checked out Café Pico, which has a lovely, quiet patio in back surrounded by flowers, Japanese maples, bamboo and other plants. It’s hard to beat good pizza, geeky art talk and sketching with friends on a sunny Friday afternoon.

Thursday, April 28, 2022

Color Temperature Studies, Morning and Afternoon


4/21/22 Maple Leaf neighborhood, morning

My fascination with color temperature continues. Although this house across the street is more awkward for me to sketch from my studio than the back view I sketch more often, it’s a better subject for studying values as well as color temperature. One sunny morning, I sketched it using my favorite CMYK primary triad (above). The side of the house being hit with full sunlight was an easy place to start with straight-up yellow, the warmest hue. I stayed with that local color (the house is actually a pale yellow) on the shady front of the house, and brought in blue to cool it down. I also used blue in the darkest areas under the porch and cast shadows on the roof. Then I started to add magenta to those areas, thinking the resulting violet would make them darkest, but it warmed up the blue even as it made it darker. As a pure temperature study, the magenta was probably wrong here, but I like the sparkle it added to the shadows. To check the values, I converted the sketch to black and white, below.

Black and white version of sketch above

Several hours later, the sun was almost directly overhead, and some clouds had come in, so there was less contrast between the front and side of the house. This time I thought I’d try a secondary triad, which I knew would be more challenging (below). In retrospect, I think I chose an orange and a green that were too similar in temperature – a cooler green probably would have been better. The rooftops were still in full sun, but their actual hue is a cool gray. I was afraid if I used violet there, they would end up being too dark in value, so I waffled and used green. The only easy part was making the darkest shaded areas and silhouetted trees dark violet, which was clearly the coolest hue.

4/21/22 Same house, early afternoon

Again, to check the values, I converted it to black and white.


When I look at the black and white versions, I think I got the relative values mostly right (at least they “read” correctly). And according to Ian Roberts (and most instructors and books that discuss values), if the values are correct, then the actual hues don’t matter (the oft-quoted “Value does the work. Color gets the attention”). All of this reinforces the basic principles that I learned in Sarah Bixler’s color temperature class months ago: Areas facing the light will be warmer; areas moving away from the light will be cooler. And yet, while I’m applying color, it’s never as straightforward as monochrome values. Maybe it’s just that I’m always simultaneously fighting the urge to use “real” colors.

(Seeing the sketch at the top of the page, a Facebook follower asked if the house really is painted yellow and green! I wish it were . . . then I could just sketch it with “real” colors and be done with it.)


Wednesday, April 27, 2022

Triceratops


4/20/22 Triceratops cast, Burke Museum


It’s been a long time since I visited the Burke Museum – more than two years, in fact. The last time was with USk Seattle when I took on the enormous mastodon replica at the museum’s lower entrance. I wasn’t quite so ambitious during our visit last week – I made a quick sketch of a triceratops skull – but it was good to be back among all the ancient bones and eons of biological history.

Tuesday, April 26, 2022

Wonky Parking


4/19/22 Green Lake neighborhood

On another sunny but chilly and windy morning, I was grateful to have my mobile studio at this dead end street. My recent color temperature study was so much challenging fun that my intention was to try another. When I started drawing, however, I got distracted by and then more interested in the cars parked at crooked angles, some halfway up on the sidewalk.

4/19/22
After I finished the sketch above, I remembered that I had been meaning to make a postcard sketch to send to a friend (I keep my box of Hahnemühle postcards in the car in case I see something that would make a good postcard). Thinking that these wonky cars might be fun for that, I pulled up a block closer and made the second sketch at right.


Monday, April 25, 2022

Sunny Kubota Garden


4/23/22 Kubota Garden

Terrace Overlook
Watching the weather forecast compulsively and scheduling on short notice are paying off as a spring strategy for USk Seattle: We were rewarded with sunny 60 degrees and a clear blue sky at Kubota Garden!

Although I had been to Kubota with Kristin Frost’s Gage class last summer, I think I hadn’t been to the garden with USk since 2015. The Terrace Overlook had just been completed then. The year prior, we had sketched a team of Ishigaki (stone wall) builders at work on the terrace. It was good to be back with USk in all that lush greenery (especially since the last time I sketched there, I could use only graphite!).

Using my favorite CMYK primary triad, I started with a sketch from behind the Terrace Overlook (at right), where a Japanese maple made a lovely, warm blur between layers of green. 

Then for my second sketch, I walked down into the lower garden area where the beautifully top-lit round bushes caught my eye (top). For that one, I used more “realistic” hues. Looking at the two sketches together, I am encouraged to continue pushing myself toward using a primary triad, even if it’s not comfortable. I think the triad sketch is a lot more lively . . . what do you think?

Ahhhh . . . it was heavenly to sketch in the warm sunshine! I dare not say the “S” word out loud for fear of scaring it away again!

Sunday, April 24, 2022

A New Sidekick


I’m now more than two-thirds done with my 100 Day Project – I can finally see the finish line! Although it’s become easier by developing short series around my “characters,” it’s still a challenge every day.

Faucet Handle now has a sidekick, Soap Dispenser. Hands are much more difficult to draw than feet! You’d think that I, of all people, wouldn’t have trouble with hands, but the scale I’ve chosen (a 3 ½-by-5 ½-inch page) is too small for detail. It’s interesting that when I’m drawing from imagination, I often have to make the hand gesture or do the yoga pose with my own body before I can draw it.

Technical note: For most of my 10-year drawing practice, I have not used a pencil underdrawing. Whether I use pencil or ink, I simply restate the line and leave the original in place because it usually disappears in the shading. I think it has forced me to become a more confident draughter. But that’s because until now, I have always drawn from observation. Now that I’m drawing from imagination, I find that I sometimes don’t know what I’m drawing until I get some lines down, and those initial thinking/searching lines make a muddy mess if they are visible in the finished sketch.

Soap Dispenser plays the mandolin in a bluegrass band.


For the first time, I’m making regular use of a non-photo blue pencil for the initial underdrawing. It’s not literally invisible when photographed or scanned, but it’s pale enough that it doesn’t muddy the final ink drawing. Although I could erase it, I don’t want to – I like seeing the evidence of my thinking and searching. My current favorites are the Blackwing and the Caran d’Ache Sketcher. Both are dark enough to see easily and soft enough not to inscribe the paper
.

Two of my favorite non-photo blues.


Soap Dispenser despises house flies.


Although it's slower, Soap Dispenser prefers using a manual typewriter.

Soap Dispenser doesn't mind chopping onions because he has no eyes.

After reading unsettling news, Soap Dispenser uses the newspaper for origami.

Trying to open a child-proof cap gives Soap Dispenser a headache.

Saturday, April 23, 2022

Maple Leaf Park Landscape


4/17/22 Maple Leaf Reservoir Park

Easter Sunday’s weather was a delightful treat – sunny, springy and even a bit warmish! (It was a cruel teaser, though, as winter returned the next day.) We took a walk through Maple Leaf Park, where I had an ideal opportunity to try out the square Hahnemühle sketchbook in landscape mode.

Easy to hold and use
I’ve used many landscape-format sketchbooks, usually during my travels, when I want to make a long, skinny panorama, but holding an 8 ½-by-5 ½-inch landscape book can be awkward. Hahnemühle’s 5 ½-inch square format, while not as long as a full 17-by-5 ½ inch panorama spread, is much easier to hold and use. The fun I remember having in my early sketching days of using the old 5 ½-inch Hand Book Journal is coming back to me!


Friday, April 22, 2022

Hot Pink, Cold Day


4/16/22 Maple Leaf neighborhood

Unlike the traditional ornamental cherries I usually put on my petal-peeping tour, the only Kwanzan cherry trees I know of in my area grow singly or in pairs, so their effect is not quite as dramatic. They make up for quantity, however, with their much showier hue – a true, bright pink rather than the near-white pale pink of ornamental sakura. They also peak several weeks later than their pale cousins, which I appreciate: Just when I think the pink season is over, the Kwanzans join the party.

Kwanzan beauty!

When I sketched
 these same trees last year, it must have been much warmer because I was able to get a better composition by standing on the sidewalk. On Saturday morning, the temperature was only in the high 30s, so I stayed in my car. I’m happy that the trees and flowers seem to know it’s spring because I’m having difficulty believing it.

Technical note: Learning my lesson the previous day at Swanson’s when I had inadvertently brought the background forward, I used non-soluble pencils for everything in this sketch except the pink and magenta blossoms. I could then spritz the blossoms freely to intensify the color, and the foliage behind them stayed in the background.

Thursday, April 21, 2022

Rooftop Color Temperature Study ala Ian Roberts

4/16/22 Green Lake neighborhood

 While sketching at Swanson’s, Ching and I had an interesting discussion about color temperature. Afterwards she sent me some links to Ian Roberts’ YouTube channel in which he demonstrates using color temperature to create dynamic urban paintings. Although I have been intrigued with color temperature ever since I took Sarah Bixler’s colored pencil workshop last fall, I haven’t had many opportunities to apply the concepts on location. Our conversation reignited my fascination.

Driving around the Green Lake neighborhood, I found this street with a good view of a block of rooftops. As many instructors do, Roberts talks a lot about simplifying everything to values and shapes. I went a step further and even simplified my palette to my favorite CMYK primary triad. Since Roberts uses oil paints, I had to “translate” painting techniques to watercolor pencils, but it was helpful to recall the optical-mixing concepts I had learned in Bixler’s workshop.

Using an approach that is closer to watercolor glazing than to opaque oils, I put a cyan tint on all the grayish rooftops and activated that layer. All the rooftops were facing the sun, so I used yellow to warm them up. Almost all the houses were brick, so I used magenta and applied water to that layer. To cool down the shady house fronts, I applied dry cyan over the magenta. I also used cyan for the cast shadows and other darkest areas.

I’m not sure if the rooftops “read” as being sunlit – maybe I should have skipped the initial cyan glaze. Using a triad palette does help me to get away from being too tied to “realistic” colors, but when I see a sunlit gray roof, it’s still difficult for me to represent that with yellow. But I guess as long as the values ring true (I hope they do), the hues don’t matter.

Incidentally, in case you aren’t familiar with Ian Roberts, I highly recommend any of his videos, which he puts out weekly. They are succinct (usually less than 10 minutes each) and highly focused on basic principles of representational art. He is an excellent teacher. Initially, I thought that his oil painting tutorials would not apply much to my use of colored pencils, but he puts such a strong emphasis on key principles such as composition and values that the medium one uses hardly matters. I sure wish I had known about him a couple of months ago when he was offering a live online course in mastering composition – that would have been a remarkable opportunity.

I’ve only just begun to go through his treasure trove of informative lessons, but so far, here are a couple of favorites that pinpoint some of the most important principles to learn about any kind of representational art making:

5 Principles to Master Anything

The #1 Composition Rule You Cannot Break

Wednesday, April 20, 2022

Companionable Geekery Amid Swanson’s Greenery


4/15/22 Swanson's Nursery cafe
The last time I sketched at Swanson’s Nursery, which used to be a regular cold-weather haunt for USk Seattle, was in February 2020 right before the pandemic settled in for the long haul. Flooded with natural light, surrounded by thriving greenery, the café was wonderful to return to, especially in good company.

My head filled with my latest colored pencil geekery, I shared my experiments with Ching as I sketched the palm behind her. I first used non-soluble pencils for most of the sketch. The only parts where I used water-soluble pencils were the two potted ferns in the background, which I spritzed with carefree ease because I knew the rest of the drawing would remain sharp. However, activation intensified the colors and brought those ferns forward instead of staying in the background. I used the right technical strategy, but it wasn’t the right choice in terms of my composition.

Another lesson learned, but I was happy to learn it, especially while having lively conversation. Excellent coffee cake didn’t hurt, either.

Spreading my gear on a cafe table... life is good.


Monday, April 18, 2022

Soluble/Non-Soluble Mixing Geekery


4/14/22 Green Lake neighborhood

The day after my mixed-media experiment, I went out looking for another scene with a variety of colors and textures in foliage that would make a good subject for this type of mixing. My goal was to use non-soluble and water-soluble media together in ways that take advantage of their qualities or so that they enhance each other. This time, instead of using Caran d’Ache Neocolor I wax pastels (which I thought might have been too waxy to mix in this way), I used only non-soluble colored pencils and watercolor pencils.

Since it was another cold morning, I stayed in my mobile studio, but the car was ideal for this experiment anyway: I needed lots of pencils – more than I would want to carry in my bag while standing! (Once I figure out what I want to do with this strategy, if anything, I’ll need to choose colors more judiciously and limit my selection for use on location.)

Using non-soluble Prismacolors and Caran d’Ache Luminance, I first drew all the parts that I wanted to remain sharp: The pale yellow-green leaves in the traffic circle, the barely visible caution sign, the car, the tree limbs and the fence. Then I went to town with Caran d’Ache Museum Aquarelle watercolor pencils on the dark purplish-red plum tree foliage and the dark green foliage growing in the traffic circle. I spritzed all the areas where I had applied watercolor pencils. I thought the effect I was going for worked better this time: The water-soluble pencils dispersed with water because I applied them mostly in areas where I had not previously applied non-soluble pencils.

When I got home, I decided to release my geek for more systematic testing of various combinations of non-soluble and water-soluble pencils. To compare apples to apples as much as possible, I used only Caran d’Ache pencils (non-soluble Luminance and Pablo and water-soluble Museum Aquarelle) so that I could match the color numbers. As you can see, though, the colors do not match exactly (though close enough if I were trying to achieve cohesiveness in a sketch). The pencil key shows the color numbers I used. I did two sets of identical tests   one on Hahnemuhle 100 percent cotton and one on Hahnemuhle "akademie"   in case there was a significant difference (there wasnt). I used a spritzer for all tests below as I would typically use in the field when I want a textural blend.

Pencil color key

Hahnemuhle 100% cotton

Hahnemuhle 100% cotton

Hahnemuhle "akademie"

Hahnemuhle "akademie"

I also tried a couple of combos using a brush (below). The arrows show the direction of my brush stroke. The different effects are interesting, but I’m not sure how I would use them.

Hahnemuhle "akademie"

Unexpected bonus sketch!
More experimentation is needed, of course, but looking at my tests and thinking about the sketches I’ve made so far, I think it’s better to apply watercolor pencil first, then apply non-soluble pencil, rather than vice versa (for the effects I’m trying to achieve). Although less than Neocolor wax pastels, wax- and oil-based pencils have enough resistance that watercolor pencils do not layer over them well compared to directly on paper, and that resistance also affects how the water-soluble pigment activates with water. I do like how the non-soluble pigments allow the texture of the paper and undissolved layers (even water-soluble layers) to show through (as in tests 3 and 7). When reversed (water-soluble applied on top of non-soluble, as in tests 2 and 6), the layer underneath is more obscured.

Mixed Media, Mixed Results


4/13/22 Green Lake neighborhood

Grabbing my mini Sendak containing non-soluble materials, I went out to run errands and stop for a sketch afterwards. I also had my usual water-soluble pencils in my everyday-carry bag. It was a great opportunity to use both soluble and non-soluble materials together to take advantage of the properties of each – a technique I think about often because it seems to have exciting potential, but I hardly ever get around to trying, especially on location.

I started by drawing the houses and nearly bare tree in the background with a non-soluble pencil because I wanted the lines to stay sharp. Then I used yellow and magenta non-soluble Neocolor I wax pastels to color the foreground trees. A little blue was applied afterwards. Then I went in fairly aggressively in select areas with water-soluble Museum Aquarelles in the same Caran d’Ache CMYK hues as the Neocolors (this is where it pays off to use different types of materials in the same brand – the colors match well, so the overall look is more cohesive).

My thought was that when I spritzed the foliage with water, the areas where I applied watercolor pencils heavily would spread and dissolve as usual. In areas where I applied very little watercolor pencil or not at all, the non-soluble crayon marks would remain undissolved and the paper tooth would be more visible.

I spritzed the page liberally, partly to test the 100 percent cotton Hahnemühle sketchbook and especially because I knew I didn’t have to worry about keeping the water off the houses and other marks that I wanted to keep crisp.

Some results surprised me: I was happy that the houses and background tree were preserved in the way that I had intended. (Why don’t I do this more often? It’s a no-brainer to draw with a non-soluble colored pencil – but it’s remembering to use it that’s a challenge!) But the wax pastels used for the foliage apparently resisted the watercolor pencils so much that not much of the water-soluble pigment seemed to adhere. Or maybe it adhered, but the wet pigment didn’t disperse the way it usually does because the resistant wax pastel kept it off the paper’s surface.

I continued to dab with water-soluble pencils while the paper was still wet, but the overall effect was not what I was expecting, which was more of an interesting contrast between the soluble and non-soluble areas. Maybe like oil and water, they don’t mix as easily as I had hoped.

Although this sketch didn’t work out the way I wanted, I am newly intrigued by the potential. Finding effective ways to use both water-soluble and non-soluble materials together would be truly exciting – if they work together instead of fighting each other. Much more experimentation is needed – and I’m up for it!

As for the 100 percent cotton Hahnemühle paper, I was pleased by how little it curled with my heavy spritzing. That’s a significant difference compared to the Hahnemühle “akademie” grade watercolor sketchbook (presumably with non-artist grade paper) that I am currently using as my daily-carry, which curls quite a bit (though flattens after the book is closed for a while). Since the paper weights are the same, it must be both the sizing and cotton content that affect ability to withstand water without curling and buckling. Other than that, I’m not sure I notice much difference in performance. I do love the square format, though.

Sunday, April 17, 2022

Finally Ready


An illuminating book on drawing from the imagination.

Whenever I read a book I own, I write the date on the title page. If I happen to re-read it, I write the successive dates, too. That’s how I knew that I had read Danny Gregory’s The Creative License five times.

The first time I read Bert Dodson’s Keys to Drawing with Imagination was in December 2011, only a few months after I had committed to learning to draw. Everything I read went way over my head. I could not get into any of the exercises – not for lack of desire or commitment, but it all seemed too hard. My second reading was in August 2020 when I became seriously interested in learning to draw from my imagination. I didn’t do many of the exercises, but reading it started to make more sense and encouraged me to keep trying. A few months later, I took a Gage workshop in using my sketchbook for something other than drawing from life, and those exercises helped me explore in ways that suited me better at the time.


A few days ago I remembered Keys to Drawing with Imagination again and started reading it for the third time. This time, I find myself repeatedly nodding to myself as I read because it all makes so much more sense – like this paragraph:

“Imagination is tightly linked to observation – a familiarity with how something actually looks makes it possible to imagine how it could look. While it is the goal of this book to help you with drawing the world as seen through imagination, there is no better way to develop the imaginative muscles than drawing from direct observation. Every time you draw from life, you strengthen the connection between your eye and your hand. These connections can be powerfully adapted to drawing the images you see in the mind’s eye.”

Didn’t I just say something like that myself? Obviously, I’m not discovering anything new here: Drawing from life is fundamental to drawing from imagination. And it’s no wonder that I got nothing from the book three months after I had begun to draw: I had no experience drawing from observation. How could I draw from my head without knowing how to draw from life? (Young children, of course, draw from their heads without ever drawing from observation, but most of us lose this ability eventually.)


After owning this book for more than 10 years, I realize that I am finally ready for it. It’s an irony of learning: Beginners (or at least this beginner) can only take in so much, even basic principles, without some degree of experience and practice. In fact, it’s a paradox: We can’t learn without practicing, but we don’t know how to practice without learning.

We’ve all heard that drawing is a skill, not an inherent “talent,” and therefore “anyone can learn to draw.” I absolutely believe that learning to draw requires no “talent.” It just takes commitment to deliberate practice and active learning (doing the work, not just viewing videos or reading). But I think we all hit a point at some stage in our practice when we see that we are not getting much better, so we get discouraged and quit. Maybe our brains are just not ready to learn more yet. Eventually, if we keep pushing and actively learning, the new learning starts showing in the results of our practice, and we step up to a new stage of development. The hard part, though, is pushing past that point instead of quitting.


I’m glad I didn’t get rid of Keys to Drawing with Imagination after my first reading. My series of drawings of a faucet handle with legs (without my intention, she seems to have taken on a life of her own) is the outcome of a couple of exercises Dodson recommends. I’m looking forward to doing more of the exercises.

(Dodson is also the author of Keys to Drawing, an excellent, classic how-to book on the fundamentals of drawing. Recommended.)


Saturday, April 16, 2022

Big Sister Sendak

Big sister Sendak!

Since the beginning of the year, I’ve been happily using my Peg & Awl mini Sendak to keep my colored pencils organized and handy in my everyday-carry bag. Every now and then, though, I’ve wished that it were just a bit bigger so that I could consolidate other sketch tools in it. Even when I was shopping for the mini Sendak, I debated whether the full-size Sendak would be better, but after much hemming and hawing, I got the mini. Whenever I rummaged in my bag for certain things that wouldn’t fit in the mini, my twinge of doubt returned: Maybe I should have gotten the larger Sendak after all.

Just like the stars had aligned for me to get the mini, a new constellation formed in the shape of Peg & Awl’s announcement a couple of weeks ago: The small Philadelphia shop was offering “mystery boxes” containing an assortment of slightly flawed “misfits: merry mishaps, prototypes, and items riddled with character – imperfect but fully functional” – at half the regular price. And some boxes could include a full-size Sendak! I’m generally not a gambler, but I had perused Peg & Awl’s catalog enough to know that any of their lovingly handcrafted products would delight me, so I knew I wouldn’t be unhappy with whatever came in my mystery box. Offered sporadically and infrequently, the mystery boxes sell out quickly. Heart palpitating, I checked out my cart. (To push the stars further into alignment, I added the following order note: “Please, please, a big Sendak, please!” It never hurts to beg, right? 😉)

A short time later, my mystery box arrived – containing a full-size Sendak! After my initial elation, I checked it out closely to find the so-called flaws, but I couldn’t see anything awry. If any flaw exists, it’s hidden by Peg & Awl’s signature rustic look and my general appreciation for wabi-sabi. It looks perfect to me!

The full-size Sendak is about the same size as an A5 sketchbook.

The full-size Sendak’s features are identical to the mini’s – just scaled larger. I immediately filled it up with the pencils that were in the mini Sendak plus other tools that were in various parts of my bag. I took the opportunity to do some much-needed weeding of infrequently used materials that had overstayed their welcome. (Skipping my annual minimalism challenge during the pandemic had taken its toll. My small fitness-walking/pandemic bag has stayed slim year-round, but meanwhile, my everyday-carry bag had been putting on some COVID pounds.)

All my tools and materials now in one place.

Everything fits beautifully! More important, the unrolled Sendak itself fits in my Rickshaw bag almost as easily as the mini Sendak does. All my materials and tools are still upright and fully accessible while I sketch. (See my post about the mini Sendak for details about the convertibility of the ever-versatile Sendak.)

The unrolled Sendak fits nicely in my daily-carry Rickshaw bag.

For this photo, I pulled the Sendak up to show the contents, but I keep it pushed all the way down in the bag.

Even as I was filling it, I was also making plans for the mini, which will certainly not go to waste. Every now and then, I get the urge to use a different palette on location, but switching out the pencils in my daily-carry palette requires time and consideration that I’d rather not take as I’m eagerly walking out the door. I’ve also been wanting to take some Caran d’Ache Neocolor I crayons out with me sometime, but these infrequently used materials are exactly the kind of thing that leap spontaneously into my daily-carry and end up staying indefinitely. I’ve decided to pack the mini with experimental materials that I am unlikely to use regularly, but if they are ready to grab in a self-contained roll, I am more likely to use them on a whim. Perhaps the mini roll will also keep my now-slim daily-carry bag from regaining excess weight.

My mini Sendak is currently filled with a couple of secondary triads, a primary triad, Neocolors in a CMYK triad and an Albrecht Durer watercolor marker.


Mobile-studio sketching with the mini Sendak.

I’m thrilled that the big and little Sendak sisters are working together to keep my tools and materials at my fingertips!

The two sisters keeping me organized!

By the way, I know you’re curious about what else was in my mystery box . . . see below. I haven’t figured out what to do with the small hanging chalkboard yet, but I immediately organized some of my many pencils and erasers in the beautiful wood pencil caddy.

Mystery box revealed!


Related Posts Plugin for WordPress, Blogger...