Tuesday, January 31, 2017

More Mail

1/30/17 brush pen, water-soluble colored pencils, ink

If you think you’re having déjà vu from a recent mail truck sketch, I wouldn’t blame you. But this one is a different type of truck – larger and full of parcels. Luckily for me, the carrier took her time making deliveries, because I had more than a few minutes to finish the sketch. (By the end of winter, I should become an expert on mail trucks, recycle bins and trees that grow near curbs.)

Sunday, January 29, 2017

Chilly Lunar New Year

1/29/17 brush pens, graphite, water-soluble colored pencils

In my experience with Urban Sketchers Seattle, we always get the highest sketch outing participation on warm summer days (surprise, surprise). Looking at the turnout today, you would have thought it was July instead of Lunar New Year! It’s obvious that a little cold and wind don’t damper the enthusiasm of sketchers, especially on the Chinatown-International District’s most festive weekend of the year. (It was especially cool that several new sketchers showed up after hearing about the outing at the “10x10” event yesterday.)

1/29/17 brush pens, water-soluble colored pencils
Shortly before the scheduled lion dance, I tried to get close enough to Hing Hay Park’s pavilion to catch the action, but I couldn’t see a thing through the throngs of people who had gotten there before me. Giving up, I walked across the street to sketch the pavilion. Although I couldn’t see the traditional lion dancers, I could hear the drums and firecrackers, so it still felt festive. Halfway through the sketch, two decorative lions on poles and a burst of confetti suddenly appeared high above the crowd, so I quickly put them in. Meanwhile, a parked car in the foreground that I had roughed in got towed away (the street was closed for the festival, so it must have been parked there overnight)! Things come and go quickly when you’re urban sketching.

Frozen to the bone, I ducked inside Wing Luke Museum for a few minutes to warm up, but I wanted one more sketch for the morning. Working my way slowly back upstream through the crowd, I spotted a great view from the street of the historic Chinatown Gate with the King Street Station tower behind it. It was a rare sketching opportunity from the closed street where I normally wouldn’t be able to stand.

I’ve been warming up at home for a couple of hours now, but I still feel chilled. So “Happy Lunar New Year” and all that, but bah-humbug – I’m sketching indoors until spring!

Saturday, January 28, 2017

USk 10x10 Program Kicks Off

1/28/17 brush pen, water-soluble colored pencils
If you keep up with Urban Sketchers news, then you’re already familiar with the fantastic “10x10” workshop program that was recently announced worldwide. To celebrate Urban Sketchers’ 10th birthday, the organization is sponsoring a series of 10 workshops in each of 30 cities so far around the globe, with many more yet to be scheduled this year. If you’re lucky enough to live in or near one of those cities, it’s almost like having a mini symposium in your hometown!

Of course, Seattle – birthplace of Urban Sketchers – is on the 10x10 map, and our program kicked off this morning with a free presentation by all the local instructors. Long-time urban sketchers as well as newcomers fully packed the large classroom at the Daniel Smith store to learn more about the 10x10 workshops and meet the instructors.

OK, so my sketches are not exactly flattering, but they’re all my friends so they forgive me. 😛 In any case, I’m looking forward to the three workshops I signed up for, and I wish I could take all 10!


Friday, January 27, 2017

Nucor Steel Plant

1/27/17 brush pen, colored pencil, ink (Giant magnets release scrap metal into a huge bin.)

Whenever I’ve visited West Seattle, I’ve wondered about those smokestacks visible from the bridge and the large industrial facility attached to them. It turns out that the facility is the Nucor Steel plant, and this morning Urban Sketchers Seattle had the good fortune to sketch inside it.

1/27/17 brush pen, colored pencil (Sketchers overlooking the scrap yard.)
Normally the facility is open to the public through two-hour guided walking tours that make only brief stops at each location. Working with Nucor environmental engineer Sean Wilson, we arranged a special tour for USk Seattle that would allow us enough time to sketch in a couple of places within the plant. In addition, visitors are not usually allowed to bring bags into the plant, but that restriction was waived for us so that we could bring our sketch gear.

Built in 1904, the mill produces more than a million tons of steel a year, mostly in the form of rebar. A large portion of the raw material for that steel is scrap metal from old cars, and that’s the production area where we spent the most time sketching. Overlooking the scrap yard, we could watch huge magnets lift heaps from the mountains of scrap metal and release them into a giant bin.

1/27/17 brush pen, colored pencil (Fiery arc furnace awaiting its next "drop.")
The most exciting part of our sketch tour was the viewing area for the arc furnace, where that giant bin of scrap metal “drops” its load into a steaming, flaming fire pit. The whole room shook like a mild earthquake! The flames erupted like a volcano too bright to watch except through the protective tinted windows. We got to witness the “drop” twice during the 45 minutes or so that we sketched there!

I had difficulty capturing the scenes we had the opportunity to sketch, but my sketchbook serves as a reminder of the fascinating process we observed. (Photography and video are not allowed inside the plant. It felt strange not to take trophy shots to share!)

Many thanks to Sean at Nucor for the tour and the special accommodations USk Seattle received! 

1/27/17 brush pen, colored pencil (Sketchers watching the furnace.)

Thursday, January 26, 2017

Trees with Three

1/26/17 colored pencil, smooth Bristol paper
Yesterday was our first lesson in foliage in the colored pencil class I’m taking at Gage. The reference photo I chose last week was OK for studying the curved form of branches, but it didn’t have enough foliage, so I abandoned that photo and chose another. This one, showing fully leafed trees in bright sunlight, seemed like a better choice.

We were to use three pencils only: A green pencil that is close to the mid-value green of the tree; a warm yellow for the sunny side of the tree; and a cool blue for the shaded side.

Shortly after I started the exercise, I regretted the reference choice. The photo includes several trees, not just one, so I had to isolate the ones in front to draw. Next I found all those broccoli-like bunches of leaves to be extremely challenging; some kind of fir or spruce might have been easier. (Maybe not – I’ll have to check with my classmates who did choose those kinds of trees.)

The three pencils I used and the photo reference.
However, I did catch on quickly to the concept of using only three pencils because of the pears and squashes I’ve been sketching with a primary palette. Using yellow, green and blue was a little easier, since the palette was closer to the hues I was seeing in the reference photo.

As I’ve mentioned before, one aspect I enjoy about using colored pencils is that the hues are mixed optically, so if an area needs to be darker and cooler, I just keep layering on more blue. If an area needs to be warmer and sunnier, I add more yellow. It’s very different (and for me, much easier) from using watercolor, with which almost all the color strategies need to be planned and decisions need to be made before the paint ever hits the paper. Pencils give me a little more time to think it through.


The tradeoff is that building color stroke by stroke takes time. This 5-inch drawing took more than an hour in class plus another couple of hours at home. I do enjoy the penciling process, though.

Monday, January 23, 2017

Marching Tools and Tips

Simple tools for marching.
After I shared my sketches from the Women’s March Saturday, some friends commented on how challenging it must have been to sketch while marching or while simply being in such an enormous crowd (latest counts put the number at close to 175,000 in Seattle). Although it was definitely the largest event I have ever attempted to sketch, I was surprised that it wasn’t as difficult as I had expected. I thought I’d share here the materials I prepared and tips I learned along the way.

The first and most important rule for me was to keep my sketch materials simple. Although many sketchers at the event were able to make spectacular sketches in full watercolor, I knew I didn’t want to attempt it. I’d be on my feet and possibly moving the entire time, so my only goal was to capture the dynamic energy of the day – not with any accuracy, precision or even color.

The crowd from afar is a mass of abstract marks.
It was helpful that I knew ahead of time that the color theme of the event undoubtedly would be pink. So I picked out a couple of shades of pink in colored pencils and Zig brush markers, and I also brought a trusty non-hairy brush pen containing waterproof ink. I did all my quick gestural sketches of the crowds with the black brush pen, then gave them small splashes of pink.

I got bumped occasionally, but the view hardly changed.
I brought my usual sketchbook signature, which is 6-by-9 inches and contains 140-pound Canson XL watercolor paper. When I fold back the side of the book I’m not using, it’s very stable for sketching, even held with one hand, and the page size gives me enough space to capture crowds.

When I first arrived at the park where the opening rally was held, I had approached from the top of a hill looking down on the crowd. At that distance, everything is abstract and relatively easy to capture with nothing more than lines and marks.

Marching (the way slugs march) in the street, we were all moving at the same pace and in the same direction, so I simply kept moving with the crowd. The view didn’t change much directly in front of me, so that was the easiest sketch to capture, even though I got bumped occasionally.

At one point during the march, I swam out of the stream and onto the sidewalk. Turning to face the crowd at a right angle, I got a different view of the participants flowing by. This time it was both easier and harder: Easier because I wasn’t being jostled by other marchers, but more difficult because the view changed every second. Still, I kept in mind that it was about capturing the group and the energy – not individuals – so I stayed loose and open to the changing scene.
I stepped out to sketch from the sidelines.

One part of my prep turned out to be unnecessary. For days before the march, the weather report had predicted rain. I was determined to participate, regardless of weather, but I still wanted to sketch. How could I prepare?

I knew that Field Notes’ Expedition notebook is made of that strange synthetic paper called Yupo, so the pages and covers are completely waterproof. I also knew that many types of inks can’t be used on Yupo because they won’t be absorbed, so they would smear or wash off the surface. Internet research indicated that the best results would come from ballpoint pen and graphite pencil. My own tests confirmed both – I could easily write with ballpoint and pencil on the page and then spray with water afterwards, or I could spray the page first and write afterwards. In both cases, the pen and pencil worked fine.

My rain kit: maybe next time.
But what about color? Finding colored pencils that worked turned out to be a challenge – my favorite soft pencils seemed to slide off the Expedition paper’s slick, completely toothless surface. Then I read on the blog Pencil Revolution that Prismacolor Verithin colored pencils do surprisingly well on Yupo pages – and author Johnny Gamber was right! Although I have a small selection of Verithin pencils, I ordinarily don’t like them at all – they are intended for precise detailing and outlining and are therefore too firm for the way I like to use colored pencils. But the hardness is apparently exactly what’s needed on Yupo paper, because I got the best colored pencil results with them.

So, armed with a graphite pencil, a four-color ballpoint pen and a pink Verithin pencil, I was ready to sketch in the Expedition notebook, rain or shine. Fortunately for us marchers, it didn’t rain at all, for which I was very grateful. A tiny part of me, though, was disappointed that I didn’t get to use my precipitation-ready sketch kit! But I’m sure another opportunity for wet sketching will turn up very soon, and instead of being bummed by the weather, I’ll give the Expedition a try. (Updated 2/24/17: Read my full review of the Expedition with field testing.)


Saturday, January 21, 2017

Seattle’s Women’s March

1/21/17 Marching toward downtown Seattle

I am generally not politically vocal. As an introvert, I prefer one-on-one conversations to public expression. Whenever possible, I avoid large crowds.

1/21/17 Women in Pussy Hats waiting for the bus.
But I have deep concern about the U.S. being led by a man whose values support so many things I abhor. I am afraid – both for my country and myself. Trump offends me whenever he speaks. Despite every cell in my body telling me to stay home, I decided to participate in Seattle’s Women’s March with the hope that the event would help me turn my anger and fear into a more productive energy.

Joining 130,000 Seattleites at what turned out to be the largest gathering in the city’s history, I felt an immense bond with all the women and men who share my concerns and fears. Although I had some anxiety about potential violence, the event was as peaceful and affirmative as I had hoped it would be. Afterwards, watching media coverage of similar marches throughout the U.S. and even other countries, I was deeply moved by the enormous solidarity demonstrated today. I came home from the event feeling hopeful that we have the collective strength to take positive action.

1/21/17 Marching through the International District

1/21/17 Gathering at Judkins Park for the rally.

1/21/17 A sea of human solidarity at Judkins Park.

Friday, January 20, 2017

Mail Truck and Recycle Day

1/20/17 brush pen, colored pencils, graphite
The last time I was able to catch a cute little mail truck in a sketch was more than a year ago. Although ubiquitous, they don’t stop for long, so they’re not easy to capture. This morning I was coming home from an errand in the Greenwood neighborhood when I spotted this one. I pulled over immediately, and just after I finished, the mail carrier showed up and took off.


1/17/17 graphite, colored pencils
Earlier this week I was driving around the Wedgwood neighborhood on recycle and garbage pickup day. As you can see, my standards for inspiring subject matter are low, especially in Winter.

Thursday, January 19, 2017

The Fundamentals – This Time with Colored Pencils

1/18/17 Derwent colored pencil, Bristol paper
I’ve taken a number of classes at Gage Academy over the past few years. Whether the focus is sketching quickly, life drawing or pen and ink, one thing I really appreciate about the Gage philosophy is that regardless of the medium or subject matter, the class is always based on the fundamentals of classical drawing. At this point in my sketching experience of more than five years, I can’t really call myself a “beginner” anymore, yet I always gain something from these fundamentals, even if I’ve heard the principles many times before.

Such is the case again this quarter in the class I began yesterday in making landscapes with colored pencils, taught by Suzanne Brooker. (Last quarter when I had signed up for a colored pencil class, it was cancelled, much to my disappointment, so I’m especially thrilled to be in this one.) Reviewing the fundamentals again drives home the point that even when the application of a particular medium is very different from another, the basic principles of two-dimensional art don’t change. Paintings and drawings are always about the relationship between light and dark – that V word again, values.

Source photo
Although it was clear from the course description that we would be working from photos as our source material, my secret hope is that I’ll be able to apply what I learn to using colored pencils on location. It won’t be the same, of course; the techniques we are learning require lots of time applying layers and layers of colored pencil to compose something closer to a painting than a sketch. But as I keep saying, I want to explore ways to make colored pencils work for me in the field, so the more I understand how they are used in the studio, the better equipped I am to figure out how to make that conversion to meet my needs. (I’m excited that we’re already talking about using a very limited primary palette – something I’ve been exploring on my own, and I seem to be on the right track!) And as far as reviewing those fundamentals of drawing goes, it’s never a waste of time.

For our first exercise, we are using a selection from the instructor’s collection of photos of trees as the source. Shown here is as far as I got during the first class. Stay tuned for the ongoing work in progress.

Wednesday, January 18, 2017

Analog and Digital

1/17/17 ink, colored pencils

It was refreshing to spot a couple of people at Zoka Coffee reading a book and a newspaper – both made of paper. I also observed a business meeting among three people, all of whom were taking notes with pens in paper notebooks. Long live analog!

1/17/17 brush pen, colored pencils


1/17/17 ink, colored pencil
Of course, there were also lots of people with their eyes glued to digital screens and their ears plugged into them.


Tuesday, January 17, 2017

Irresistible

When I saw how great my custom tote bag from Rickshaw Bagworks turned out, I couldn’t resist getting a second one before the discount coupon expired.

This time I decided to get a smaller tote, and I wanted to use a couple of sketches done in a Field Notes Sweet Tooth notebook. I wasn’t sure how well the red-orange background would reproduce, but I took a chance and picked out a couple – one of the tower on Denny Hall on the University of Washington campus and one of a fellow bus rider. I think Rickshaw’s digital printing process nailed the color beautifully!

Monday, January 16, 2017

Street View

1/12/17 brush pen, colored pencil
The past couple weeks we’ve had the longest-running streak of cold temperatures I can remember. Most winters we have a few days at a time with temps in the 20s, but it’s rare for cold snaps here to last longer than that. Fortunately, it’s also been sunny on most of those days, which makes the cold a little easier to bear.

My “mobile studio” has been serving me well. I just drive around looking for a street scene that catches my eye, and by the time I find one, my car is fully heated – I’m good for at least a half-hour.

1/16/17 graphite, colored pencil
1/13/17 graphite

Sunday, January 15, 2017

A Box of Pencils

No one needs 22 grades of graphite drawing pencils.

I wanted to say that up front so you wouldn’t think this post was about rationalizing why I need a whole set of Uni Mitsubishi Hi-Uni pencils or how I’d use all 22 grades. (This is not unlike why I own entire 120-color sets of colored pencils when 24 or 36 would be plenty, especially when I’ve lately been trying to use only three primaries at a time. But that’s the subject for a different post.)

Perhaps some graphite artists use several pencil grades to achieve the fullest range of tonal values, but even so, I doubt they would use 22. For most of the sketches I do, I find that I can get by with two pencils at a time – one mid-range (such as HB or F) and one soft (such as 4B or 6B). I’ve also done many sketches with just one relatively soft pencil (maybe a 2B or a Blackwing). After all, one of the virtues of graphite is being able to create a variety of tones simply by layering or varying the pressure.
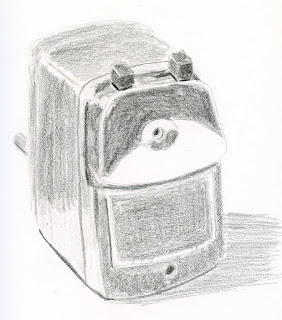
1-14-17 Hi-Uni H, 9B

I already knew from my experience with a few individual Hi-Uni pencils that the line is excellent – the core, the wood casing, the finish. Smoother than any pencil I have used, the softer grades write and draw almost soundlessly. Esthetically, they are lovely – the shiny maroon lacquer is imprinted with gold, and the end has an elegant divoted yellow dot. They have become my favorite pencils. What would it be like to own an entire extravagant set?

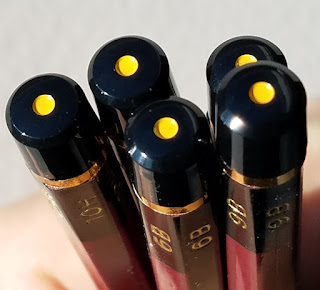
Divots of yellow on the ends.

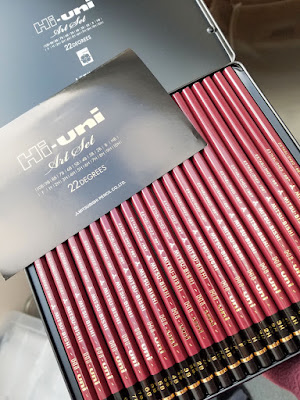
When I ripped the wrapper off the metal box and opened it for the first time, I was immediately taken back to my mom’s traditional cedar chest. Kept in my parents’ bedroom, the chest stored silk kimonos, dark wool sweaters and other clothing and accessories that rarely saw the light of day. It seemed she lifted its heavy lid only a couple of times a year, so as a child, the scent of cedar told me I had an opportunity to peek inside at the otherwise hidden treasures.
 
Take a sniff of that cedar!
At the same moment that I inhaled this memory-infused scent, I saw the most extraordinary sight: Shipped all the way from a vendor in Japan, all 22 pencils lay in their slotted tray with their logo side facing up. Now, I’ve opened plenty of flat packages of colored pencils to find them randomly and haphazardly in their slots and thought nothing of it – I’m not so fussy or OCD to be bothered. But when I saw every Hi-Uni lying so perfectly, even if the pencils had been placed in the tray mechanically (though I doubt it), I had to believe that a human at the end of the line was responsible for making sure they all faced up by the time the lid was closed. (I immediately took a photo so that I could bear to take them out.)

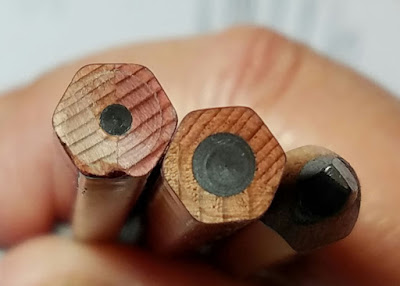
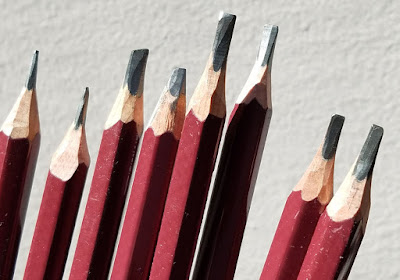
The next marvel was examining their unsharpened ends. From using a 10B previously, I knew that it had an unusually thick core; how thick would the cores of the other grades be? It turned out that the full range includes three sizes: 10B and 9B have the largest; 8B through 3B have a medium-sized core; and 2B and harder have a small (standard-size) core.
 
Left to right: 5B, 4B, 3B, 2B, B
Left to right: 10H, 9B, 10B (hand-sharpened)

Though it took me half a day to get over the sheer beauty of that box of pristine, unsharpened pencils, I did get over it – after all, pencils are made to be used. I took out my knife; certainly, the larger-core pencils deserve a hand-sharpened chisel cut to ensure the widest range of marks. Compared to some other pencils I’ve knife-sharpened, the wood of the Hi-Unis cut easily and evenly without splintering. For the smaller cores, I used my KUM two-hole, long-point sharpener and amused myself with the delightful curls of shavings that emerged.

Knife-sharpened
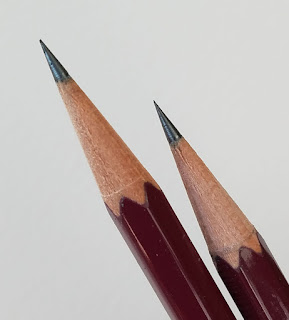
KUM long-point sharpened


All of that joy came even before using the pencils. And now that I’m using them, they are as smooth and perfect as they appear.

No one – maybe least of all me (I tend to favor softer cores and will probably rarely use the harder ones) – needs 22 grades of graphite drawing pencils. Still, it’s rare to experience complete pleasure from such a simple product made well and presented with pride.

1/13/17 Hi-Uni 7B
11/23/16 Hi-Uni 10B

Related Posts Plugin for WordPress, Blogger...