 |
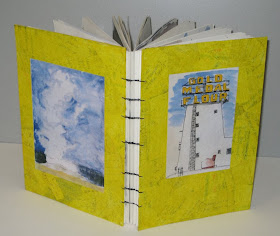
| My second handbound sketchbook completed. |
Right on my predicted schedule, I filled six more sketchbook signatures between returning from
Europe in July and September. And now that I’m filling them with 140-pound paper and therefore making each signature with three
folded sheets instead of four, I’m completing them faster than ever. I don’t
like the idea of lots of unbound signatures stacking up, so I needed a
streamlined process for making covers and binding the books. Having just
completed binding my second sketchbook, I think I’ve developed a process that
works.
First, the covers. Deciding how to make the backgrounds of
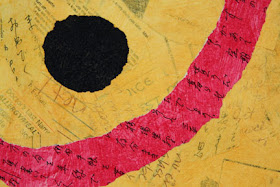
the covers was relatively easy. A few years ago I had completed a body of work of collages made of torn up bits of paper with handwriting on them – letters, old planners, even school papers (go to my
website by clicking the previous link to read the artist statement). Below is a detail of one such collage. I still have piles and piles of those old
papers left, as well as lots of acrylic paint and matte medium – why not use them
to make the covers in the same way I used to make collages?
I also wanted to incorporate reproductions of a sketch or
two on the covers. Thematically, that task was easy: I didn’t necessarily want
the “best” or my “favorite” sketches; I wanted to use sketches that would
somehow represent the contents of the pages between the covers. Since I had
traveled to both the Twin Cities and Yellowstone during the period contained in
the signatures I was binding, I chose one sketch from each location (both in a
portrait format to fit the covers).
Mechanically, however, the task was a bit more difficult. I
could print a digitized image of a sketch with my inkjet printer, but inkjet
ink is water-soluble, so it would bleed and run when I glued it to the cover
with matte medium. Again, I went back to some experiments I had tried during my
collage days and remembered that if I sprayed the inkjet image with acrylic
varnish, the ink wouldn’t run. So, despite my general avoidance of spray-on
substances that come in cans covered with skull-and-crossbones and other dire
warnings, I took the printouts outdoors and sprayed them. That did the trick.
Once I figured out these steps, I streamlined the process by
working partially in bulk:
- I bought a stack of chipboards and cut them to size.
- I got out my matte medium and handwritten papers and spent a couple of cold, foggy mornings putting collage all over the chipboard pieces. (This is the most time-consuming step, but I made enough covers to this point for four more sketchbooks.)
- I chose the sketches I wanted on the covers, printed the images and sprayed them with acrylic varnish.
- I painted one set of covers bright yellow to coordinate with the sketches I had chosen. After the paint dried, I glued the images in place.
- To protect the covers and give them a cohesive surface, I applied two coats of more acrylic varnish (not a spray this time, thank goodness).
- I drilled the covers and bound the book together with Coptic stitch (this last part is my favorite of the whole process).
When I fill enough signatures for the next sketchbook (which will be in a
matter of days, since I’ve filled more than five signatures since September), I
only have to do Steps 3 – 6 above, which won’t take much time.
I say this process won’t take “much time,” but of course it
takes significantly more time (several hours per book) than going to the store
and buying a sketchbook. But now that I’ve finished hand-binding my second
sketchbook, I’m hooked on this process in a way that I never thought I would
be. I’ve said this before, but I’m
finding it immensely satisfying to hand-bind a volume of my own hand-drawn sketches.

Thanks for sharing your process! It makes me think, again, about doing something similar.
ReplyDeleteIt's simply and craft-y, but I've used Mod-Podge to both glue and seal ink jet printed graphics on my sketchbooks. I make my own stickers that way.
--Kate